
Installation guide


Page 6
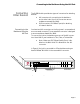
Installing the RJ45B Module
Installing the
RJ45B Module
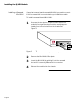
The NetStacker or AsantéHub 2072 chassis should be installed
before you can install the RJ45B Module.
To install the RJ45B Module:
1
Remove the module from its antistatic packing, taking
care to observe proper antistatic procedures.
∆
Note: Handle the module only by its edges. Do
not touch the chips or connectors.
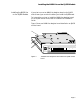
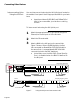
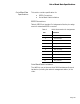
2
Align the module to the edges of the card guides on
the slots in the chassis. Gently slide the module in
until you can begin tightening the screws. See
Figure 4.
Figure 4 Installing the RJ45B Module
3
Tighten the module to the chassis by hand or use a #1
slot screwdriver, fastening the screws in unison and
using the same amount of force to attach the module
evenly to the chassis.
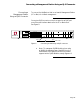
4
Turn on the power on the hub.
The SEG1 LED lights indicating the module is properly
connected to network Segment 1.
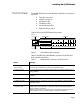
5
When you connect a node to the hub using UTP cable,
the Link/Receive LED on the used port turns green,
indicating a link is established between the node and
the hub.
ASANTÉ
10BASET
POR
T
NetStacker-RJ45
LINK/RECEIVE
PARTITION
LINK/RECEIVE
PARTITION
1234 5678 9101112
1234 5678 9101112
UPLINK 0
AUI
UPLINK 0
AUI
5671234
5671234