
Repair Manual, Parts List, Diagrams and Assembling Charts


23102 Page 18
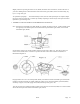
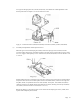
g. ASSEMBLY AND ADJUSTMENT OF COUNTER DIAL MECHANISM
Insert the counter dial coupler lever shaft (03062) into the counter dial coupler lever (03017) to which fix
washer (W 8), counter dial ratchet (03219, 03319 or 03419), counter dial ratchet spring (03082) and counter
dial coupler lever collar (03063), in this order.
Holding down (03063) with a screw-driver, hook (03082) on the counter dial ratchet stud (03077) of (03219,
03319 or 03419) with tweezers.
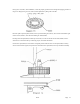
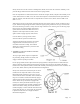
With the tip of tweezers, rotate (03017). It should move smoothly. Keep holding down (03063), slowly rotate
(03044) clockwise with another screw-driver, and one of the two cogs of the counter dial actuator (03021)
starts gearing with the counter dial 1st gear (03030).
It is important that the two gears engage smoothly. If the gearing of the cogs is unsatisfactory, replace counter
dial ratchet with a new one with proper size. For adjusting purposes, counter dial ratchet is available in three
different sizes: (03219), (03319) and (03419).
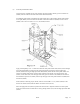
While still holding down (03063), install the counter dial actuator lever collar (03060) and the counter dial
actuator lever spring (03083) on the counter dial actuator lever shaft (03059). For easier installation, assemble
(03059) and (03083) together before hand. Place the end of (03083) into a small concave inside the body
proper.