
Owners manual


Disabling the Provisioning Wi-Fi Network
The provisioning network is enabled by default. Instant provides the option to disable the provisioning network
through the console port. Use this option only when you do not want the default SSID instant to be broadcast in your
network.
To disable the provisioning network:
1. Connect a terminal or PC/workstation running a terminal emulation program to the Console port on the IAP.
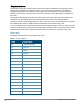
2. Configure the terminal or terminal emulation program to use the following communication settings:
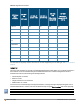
Baud Rate Data Bits Parity Stop Bits Flow Control
9600 8 None 1 None
Table 6:
Terminal Communication Settings
3. Power on the IAP. An autoboot countdown prompt that allows you to interrupt the normal startup process and
access apboot is displayed.
4. Click Enter before the timer expires. The IAP goes into the apboot mode through console.
5. In the apboot mode, use the following commands to disable the provisioning network:
n apboot> factory_reset
n apboot> setenv disable_prov_ssid 1
n apboot> saveenv
n apboot> reset
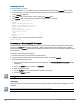
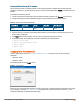
Logging in to the Instant UI
Launch a Web browser and enter http://instant.arubanetworks.com. In the login screen, enter the following
credentials:
l Username— admin
l Password— admin
The following figure shows the Login screen:
Figure 1 Login Screen
When you use a provisioning Wi-Fi network to connect to the Internet, all browser requests are directed to the Instant
UI. For example, if you enter www.example.com in the address field, you are directed to the Instant UI. You can
change the default login credentials after the first login.
Aruba Instant 6.4.0.2-4.1 | User Guide Setting up an IAP | 37