
Owners manual
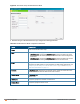
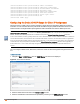

4. Enter the duration of the DHCP lease in the Lease time text box.
5. Select Minutes, Hours, or Days for the lease time from the drop-down list next to Lease time. The default lease
time is 0.
6. Enter the network range for the client IP addresses in the Network field. The system generates a network range
automatically that is sufficient for 254 addresses. If you want to provide simultaneous access to more number of
clients, specify a larger range.
7. Specify the subnet mask details for the network range in the Mask text box.
The DNScache function is only enabled when content-filtering is disabled.
8. Click OK to apply the changes.
In the CLI
To configure a DHCP pool:
(Instant AP)(config)# ip dhcp pool
(Instant AP)(DHCP)# domain-name <domain>
(Instant AP)(DHCP)# dns-server <DNS-IP-address>
(Instant AP)(DHCP)# lease-time <lease-time>
(Instant AP)(DHCP)# subnet <IP-address>
(Instant AP)(DHCP)# subnet-mask <subnet-mask>
To view the DHCP database:
(Instant AP)# show ip dhcp database
DHCP Subnet :192.0.2.0
DHCP Netmask :255.255.255.0
DHCP Lease Time(m) :20
DHCP Domain Name :example.com
DHCP DNS Server :192.0.2.1
Aruba Instant 6.4.0.2-4.1 | User Guide DHCP Configuration | 210