
Owners manual

209 | DHCP Configuration Aruba Instant 6.4.0.2-4.1 | User Guide
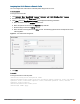
(Instant AP)(DHCP Profile <profile-name>)# subnet <IP-address>
(Instant AP)(DHCP Profile <profile-name>)# subnet-mask <subnet-mask>
(Instant AP)(DHCP Profile <profile-name>)# exclude-address <IP-address>
(Instant AP)(DHCP Profile <profile-name>)# dns-server <name>
(Instant AP)(DHCP Profile <profile-name>)# domain-name <domain-name>
(Instant AP)(DHCP Profile <profile-name>)# lease-time <minutes>
(Instant AP)(DHCP Profile <profile-name>)# option <type> <value>
(Instant AP)(DHCP Profile <profile-name>)# end
(Instant AP)# commit apply
Configuring the Default DHCP Scope for Client IP Assignment
The DHCP server is a built-in server, used for networks in which clients are assigned IP address by the Virtual
Controller. You can customize the DHCP pool subnet and address range to provide simultaneous access to more
number of clients. The largest address pool supported is 2048. The default size of the IP address pool is 512.
When the DHCP server is configured and if the Client IP assignment parameter for an SSID profile is set to
Virtual Controller Assigned, the Virtual Controller assigns the IP addresses to the WLANor wired clients. By
default, the IAP automatically determines a suitable DHCP pool for Virtual Controller Assigned networks.
In the current release, the IAP typically selects the 172.31.98.0/23 subnet. If the IP address of the IAP is within the
172.31.98.0/23 subnet, the IAP selects the 10.254.98.0/23 subnet. However, this mechanism does not guarantee
that it would avoid all possible conflicts with the wired network. If your wired network uses either 172.31.98.0/23 or
10.254.98.0/23, and you experience problems with the Virtual Controller Assigned networks after upgrading to
Aruba Instant 6.2.1.0-3.4 or later, manually configure the DHCP pool by following the steps described in this
section.
You can configure a domain name, DNS server, and DHCP server for client IP assignment using the Instant UI or
CLI.
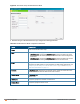
In the Instant UI
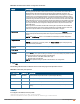
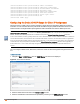
1. Navigate to More > DHCP Server tab. The DHCP Server tab contents are displayed.
Figure 63 DHCPServers Window
2. Enter the domain name of the client in the Domain name text box.
3. Enter the IP addresses of the DNS servers separated by a comma(,) in the DNS server (s) text box.