
Owners manual

205 | DHCP Configuration Aruba Instant 6.4.0.2-4.1 | User Guide
(Instant AP)(DHCP Profile <profile-name>)# server-vlan <vlan-ID>
(Instant AP)(DHCP Profile <profile-name>)# client-count <number>
(Instant AP)(DHCP Profile <profile-name>)# dns-server <name>
(Instant AP)(DHCP Profile <profile-name>)# domain-name <domain-name>
(Instant AP)(DHCP Profile <profile-name>)# lease-time <minutes>
(Instant AP)(DHCP Profile <profile-name>)# ip-range <start-IP> <end-IP>
(Instant AP)(DHCP Profile <profile-name>)# reserve {first | last} <count>
(Instant AP)(DHCP Profile <profile-name>)# option <type> <value>
(Instant AP)(DHCP Profile <profile-name>)# end
(Instant AP)# commit apply
Configuring a Centralized DHCP Scope
You can configure centralized,L2 and centralized,L3 DHCP profiles. When a centralized DHCP scope is configured:
l The Virtual Controller does not assign an IP address to the client and the DHCP traffic is directly forwarded to the
DHCP Server.
l For Centralized, L2 clients, the Virtual Controller bridges the DHCP traffic to the controller over the VPN/GRE
tunnel. The IP address is obtained from the DHCP server behind the controller serving the VLAN/GRE of the
client. This DHCP assignment mode also allows you to add the DHCP option 82 to the DHCP traffic forwarded
to the controller.
l For Centralized, L3 clients, the Virtual Controller acts as a DHCP relay agent that forwards the DHCP traffic to
the DHCP server located either in the corporate or local network. The centralized L3 VLAN IP is used as the
source IP. The IP address is obtained from the DHCP server.
You can configure a centralized DHCP scope through the Instant UI or CLI.
In the Instant UI
To configure a centralized DHCP scope:
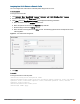
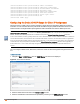
1. Click More > DHCP Server. The DHCP Server window is displayed.
2. To configure a centralized DHCP scopes, click New under Centralized DHCP Scopes. The New DHCP
Scope window is displayed.
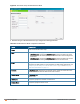
3. To configure centralized,L2 profile, select the profile type as Centralized,L2 or Centralized,L3 and configure
the following parameters.
Name Description
Name
Enter a name for the DHCP scope.
Type
Set the type as follows:
l Centralized,L2 for the centralized,L2 profile
l Centralized,L3 for the centralized,L3 profile
VLAN
Specify a VLANID. To use this subnet, ensure that the VLANID specified here is assigned
to an SSID profile. For more information on SSID profile configuration, see Configuring
VLAN Settings for a WLAN SSID Profile on page 97 and Configuring VLAN for a Wired
Profile on page 114.
Split tunnel
Set this to Enabled or Disabled for split tunnel functionality for the centralized,L2 subnet.
Table 39:
Centralized DHCP Mode: Configuration Parameters