
User`s manual

ARTURIA – MiniLab – USER’S MANUAL 27
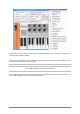
5 USING MINILAB WITH OTHER SOFTWARE
5.1 Creating MIDI Presets with the MIDI Control Center
5.1.1 Overview: What is a MiniLab Preset?
Thanks to the MIDI Control Center software described in chapter 4 it’s possible to
configure the MiniLab to work with practically any device or software capable of
responding to MIDI information.
To summarize, here are some examples of what you can do with a MiniLab preset:
Assign pads to send MIDI Machine Control commands (MMC)
Use the pads or the pedal to transmit MIDI notes
Switch between two values of any MIDI CC# by playing a pad
Assign an encoder to control any MIDI CC# and define its operational range
Send Aftertouch messages from the Mod strip, set its min/max limits, and select
‘return to zero’ or ‘hold’ behavior
Save the entire set of altered controls to one of MiniLab’s eight preset locations
Define another seven sets of parameter assignments and save each one to a
different memory location
Recall any of the eight personalized presets easily and immediately.
We’ll take you through examples of those scenarios in this chapter.
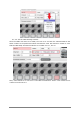
5.1.2 Assign a Pad to Start / Stop MMC
One feature that often comes in handy with a controller keyboard is the ability to start
and stop a song without having to use the computer keyboard or mouse. It’s really easy
to set up the MiniLab pads to do that.
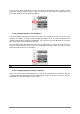
For this example we’ll use Pad 7 to send Stop commands and Pad 8 to send Start
commands. This is accomplished through the use of MIDI Machine Control commands,
which you’ve probably seen abbreviated as “MMC”.
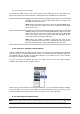
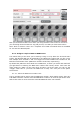
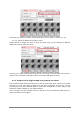
5.1.2.1 Select the Pad Mode
Let’s begin by selecting Pad 7 by clicking on its graphic in the MIDI Control Center or by
tapping Pad 7 on the MiniLab. Then click the Mode field to activate the pull-down menu: