
User`s manual


62 ARTURIA – Analog Lab – USER’S MANUAL
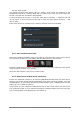
Now activate the control on your controller keyboard and move it through its full range.
You will see its identifying MIDI information captured by the MIDI Control Setup window.
Once you have established this connection you can move on to the next pair of controls
or exit MIDI Control Setup mode by clicking the MIDI button in the tool bar again.
Note that the knobs and sliders in the Controls section of the virtual keyboard have also
entered MIDI assignment mode. These controls are shared among all three modes, so be
mindful that a change made to the MIDI assignments of these controls will be effective
in Sound and Live modes as well.
Be sure to save your entire MIDI configuration once you have set up the controllers the
way you want them. To learn more about this, see section 5.3.5.
5.7 Live mode
Analog Lab allows you to assign a series of Sounds and/or Multis to particular MIDI
program change numbers so a MIDI controller keyboard or a host application such as a
DAW can select them easily.
To enter Live mode, locate and click its button in the tool bar:
Live mode selected
There are three main areas in the Live mode screen: the Preset selection window, the
Preset/Song details window, and the Program Map.
Preset selection: Select a Multi or Sound from their respective Preset lists and
drop them into the Program Map.
Preset/Song details: View details about the current Multi or Sound and enter
the name of an associated Song.
Program Map: This is the main focus of Live mode. Drag and drop Multis and
Sounds to the Program Map in the desired order so they can be called up using
MIDI Program Change numbers.
5.7.1 Selecting a Preset for the Program Map
First decide whether you want to place a Multi or a Sound into Program Map by selecting
one or the other category at the top of the Preset list: