Chengying Navigation Manual Version 1.1.1 Date: September 8, 2020 Note: This document provides machine-related deployment procedures and precautions. Follow the instructions in the document to avoid abnormal situations when the machine is used later.
Contents Robot use environment requirements ..................................................................................... 3 Specification .................................................................................................................................... 4 Meet your robot ............................................................................................................................. 5 Get to know your charger..............................................................
Robot use environment requirements The working environment cannot have a lot of transparent glass Cannot be used where there are stairs or where the drop is more than 2cm There should not be a lot of black marble and black reflective cabinets at the floor height of 50cm Can’t travel on the ground with high friction.
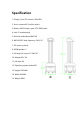
Specification 1. Display:7-inch IPS screen (1024*600) 2. Vision camera:HD 5 million pixels 3. Battery:18650 battery pack 37V 20800 mAh 4. Intel: I5 motherboard 5. Android motherboard:RK3128 6. WIFI:AP6255 dual frequency 2.4G+5G 7. 4G router optional 8. 4R3W speaker*1 9. UV lamp,UV output 11.2W UVC 10. Adapter 42V 3A 11. Life time 3H 12. Operating system Android5.1 13. Height 1542MM 14. Width 450MM 15.
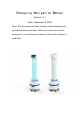
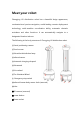
Meet your robot Chengying UV disinfection robot has a beautiful beige appearance, centimeter-level precise navigation, world-leading remote deployment technology, multi-machine coordination ability, automatic obstacle avoidance and other functions. It can automatically navigate to a designated location indoors.
Cleaning precautions: ② Touch screen ⑩ Laser navigation, please do not wipe it with a wet towel to avoid water ingress! Precautions for use: ⑩ Laser: Do not block the laser with objects ⑨ Emergency stop switch: the emergency stop switch can only be rotated to the right, do not rotate to the left Get to know your charger The adapter plug needs to be plugged into the 220V mains power supply, and the DC plug is plugged into the automatic charging pile.
is a button switch. Press it once to turn it on, and press and hold the power button for 3 seconds to turn it off. Note for shutdown: Press and hold the power button for 3 seconds, the display will first turn off the screen and shut down, then the motor will be powered off, and finally the chassis light will go out! 2.
Direct charging: plug the power adapter cable into the power supply on the back of the robot 3. Navigation The step 1 [Network Settings ] Note: The router network segment cannot be the 192.168.10.x network segment 1. Open the [Settings]-[WLAN] on the Android screen of the robot to connect to Wi-Fi 2. Open the Ftp application and enter the following interface. Follow the steps shown in the figure. If the Wi-Fi password already exists, click "Send Wi-Fi Information to Connect to ROS".
① Check the Wi-Fi name you want to connect to ② Enter Wi-Fi password ③ Send Wi-Fi information to the navigation system ( just click once, don't click repeatedly) ④ Observe connection status ⑤ Show IP for connection success (show 127.0.0.1 for connection failure) 3. The scanning device should be connected to the same LAN as the machine.
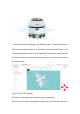
1. After entering the webpage, the default state is "Navigation Mode". After pushing the machine to a spot with obvious feature points, click "Mapping Mode" and select "Laser Mapping" to enter the state as shown in the figure below to start generating the map. Let me teach you how to Generate a map.
control the robot, or use the keyboard arrow keys to control the robot to create a map; you can also press the emergency stop switch to push the machine to create a map 2. After entering "map mode", the machine first rotates in a circle to clean the surrounding feature points. When rotating, the speed should not be too fast. After one rotation, you can push (control) the machine. You can walk straight in narrow areas. Pay attention to the gaps during walking.
Figure 1: mismatch between laser and terrain (when the laser does not match the terrain, stop and wait for the laser to match the terrain before pushing the robot to build the map) Figure 2: matching of laser and terrain (some areas need robot to turn to be able to scan clearly, such as wide terrain and room) 4. Do not move the machine after the machine reaches the end point. Just observe whether the map is clean, without ghosting and matches the actual terrain.
2. When pushing or controlling the robot, walk slowly and observe whether the laser matches the terrain. If there is a mismatch, stop and wait for the laser to match the current terrain. 3. After the robot reaches the destination, observe whether the map is clean without ghosting and matches the actual terrain. If there is no obvious dislocation, click "composition complete". If there is any dislocation, please wait for a period of time, and the algorithm will correct it.
Drag: in this mode, you can zoom, pan and rotate the map. In this mode, you can select a rectangular area according to "Ctrl + left mouse button", and the virtual wall in this area will be cleared Draw curve: you can draw a curve, which is often used to draw irregular terrain Draw a straight line: click two positions to draw a straight line between the positions you click.
figure 2 Map scanned by laser figure 3 error figure 4 correct Example: table Note: the laser can only scan one horizontal plane, so when drawing the virtual wall, consider the desktop projection figure 1 Actual environment figure 2 Map scanned by laser figure 3 error figure 4 correct matters needing attention: 1、The minimum passing distance of the machine is 80cm, so attention should be paid when drawing the virtual wall 2、The main function of the virtual wall is to draw the robot's moving space and s
etc.) please make sure to build virtual walls. 4、Click "navigation mode" after saving to return to navigation mode.
Edit mode click the left mouse button on the map in order to form a polygon It is recommended to mark the long corridor with no obvious characteristic points more than 10 meters with special area When drawing special areas, pay attention not to cover the end of the corridor, and reserve a distance of at least 2 meters matters needing attention: 1、The main function of special area is to deal with some areas with single feature points (such as long corridor) or few feature points (such as open hal
The function of editing map: correcting the errors in scanning map Premise of map editing: if an obstacle is missed in the process of scanning, or the map changes after scanning, and the change is not big, you can use the map editing function to edit the map properly.If the map is too different from the actual environment, it is recommended to scan again. ① Click Save to apply the map modification ② Clear drawn polygons ③ Here is the drop-down menu.
clearly when building the map, so it is necessary to draw obstacles artificially on the map (note that the obstacles drawn must match the obstacles that can be swept by the real laser). Unknown area: some frequently changing feature points need to be drawn into unknown areas (for example, the area where robots will not walk outside the glass wall).
with the original position due to too many wrinkles 7.
intersection Click the left menu bar to switch to QR code mode ①When pushing the robot past the QR code label, these two label options will pop up, you can choose the type of label you want to set ②c starts with Ordinary label: When an ordinary label is detected, the robot will relocate near the location, generally used when the machine is easy to lose positioning ③ At the beginning of j- is the forbidden zone label: when the forbidden zone label is detected,the machine will immediately stop navigation, re
2. If you encounter a mismatch between the laser and the map of the robot (the positioning is wrong), you need to perform a relocation operation first to reposition the robot accurately. 3. After controlling the robot directly under the QR code label, the button "Common Label" and "Forbidden Area Label" will appear in the button bar at the top of the map.
be marked on the map and the device must be powered on near this location.
Precautions: 1. When calibrating the position, make sure that the current positioning of the machine is correct. 2. The calibrated position must be at least 50 cm away from surrounding obstacles and virtual walls. 3. It is recommended to control the robot to 1 meter directly in front of the charging pile. Use "Get Current Position" to set it. Make sure that the setting position is accurate. 4. It is recommended that there are no obstacles within 1.
The Step 8 [ map ] ①Edit map name ② Apply this map ③ Export this map ④ Delete this map ⑤ Mouse over to show preview map, click to show original image Note: The map will not be applied immediately after uploading, you need to find the row of the map in "All Maps" and click the "Apply" icon
The Step 9 [ upgrade ] ① Apply this version ② Delete this version The Step 10 [ Debug ] ① Turn on the emergency stop switch of the machine manually ② Close lock: open 36V external power supply ③ Unlocking: turn off 36V external power supply
Precautions for the use of UV lamps When using the UV disinfection robot, people and animals should stay away from the UV irradiation area and do not look directly at the UV light source. The best temperature for ultraviolet disinfection and sterilization is 15-45°, and the relative humidity is less than 80%.
appropriately extended. The radiation intensity of the ultraviolet disinfection robot is gradually reduced during use, and the ultraviolet radiation flux should be measured regularly. The lamp is recommended to be replaced after 8000h. In daily use of UV disinfection robot, the lamp should be kept clean, and the surface of the lamp should be cleaned in time when the power is off.
FCC Caution This device complies with part 15 of the FCC Rules. Operation is subject to the following two conditions: (1) This device may not cause harmful interference, and (2) this device must accept any interference received, including interference that may cause undesired operation. Any Changes or modifications not expressly approved by the party responsible for compliance could void the user's authority to operate the equipment.