
Guide


1
2
3
4 5
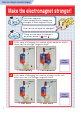
Setthearmaturefirmlyintothemotorcase.
Holdthe200-turnelectromagnetbetweenthe
frontandbackarmatureparts,thenputthe
startingknobonit.
Referringtopage3,
windeachsideofthe
enameledwireonto
eachbobbinstopperof
the200-turn
electromagnet.
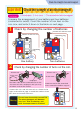
Putthebatteriesinit,thenturntheswitch
on.Turnthestartingknobandcheckthat
themotorstartstorotate.
Cuttheplastic
wireat30cm
andremove
theplastic
coverfora
lengthof4cm
fromeachend.
Thenattach
thewiresto
theplugsas
shown.
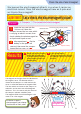
Wecanseethattherearelotsofelectric
appliancesthatuseelectromagnets.Almostallof
themarebuiltwithamotorintheappliancewhich
usestheforceofanelectromagnet.Tolearnabout
themotorwhichisusedinanappliance,let'smake
amotor!
Front
armaturepart
Commutator
Awire
Awire
Batteryholder
Startingknob
Motor
Startingknob
Back
armaturepart
Shaftretainer
Armature
Motorcase
Commutation
brush
Electromagnet
with200turns
Finished
Howtoattachtheconnecting
plugstothecoatedwire
1.
3.
2.
Insertalltheway
②Motorcase③200-turncoil⑦Enameledwire⑧Coatedwire
⑨Armature⑩Shaftretainer⑪Connectingplug⑫Sandpaper
AssemblyAssembly
Whatyouneed
fromthekit:
Let'smakeyourmotor!
Finished
Threadtheendof
thewirethrough
theholeabout4
cmandfoldit
back.
Winditaround
theplugseveral
times.
★Windtightly
sothewirewill
notstickout.
Turn
ON!
11
Make a motor!