
User`s manual

Page 6 · 4200 Series LaserSource User’s Manual
Quick Start
The LaserSource was designed with ease of use in mind, and you will likely
have little need for this manual for almost all of the features the unit offers. This
section will show how you can quickly get the unit up and running in almost no
time.
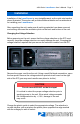
After unpacking the unit, ensure that the voltage selection on the Input Power
Connector (IPC) on the back of the unit is set to the correct voltage. This is
critical, as incorrect voltages can damage the unit. The LaserSource is shipped
in the 120V configuration from the factory. Change the voltage as needed. For
more information, refer to the IPC section below.
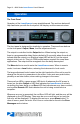
Once the voltage selection has been completed, plug the AC cord into the unit
and into the wall outlet. Turn on the power switch located on the IPC, and the
unit will power up, displaying the model information, serial number, and firmware
version number.
Press the Menu button to enter the menu, and using the knob, turn to the right
until the Io Lim setting is displayed. Press the knob to edit the setting, and
adjust the limit as appropriate to your laser diode. Press the knob again to save
the value. Make the same adjustments to the voltage limit (Vf Lim), as
appropriate for your application. Once you have made all your adjustments,
press the Menu button to exit the menu.
Next, connect the cable between your LaserMount or other fixture and the
Output connector of the LaserSource. We recommend using our cables as they
have been designed to work well with the LaserSource. If using your own
cables, ensure they have been properly wired according to the pin-out of the
LaserSource and your fixture.
Finally, set the set point to an appropriate current and press the Output button.
The output will turn on and you will see the actual voltage and photodiode
current displayed on the second line.
It’s that simple. For more detailed operating and installation instructions, read
on.