
User`s manual

Page 10 · 4200 Series LaserSource User’s Manual
Operation
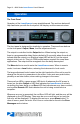
The Front Panel
Operation of the LaserSource is very straightforward. The sections below will
help familiarize you with the front panel, the display, and the menu structure.
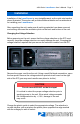
The front panel is designed for simplicity in operation. There are three buttons
on the front panel: Output, Menu, and the adjustment knob.
The output is controlled via the Output button. When turning the output on,
there is a programmable delay (factory default of 3 seconds) where the unit will
indicate that the output is on (the blue output LED will be lit), but the output
stage is in fact not on. This is a CDRH safety feature required for some laser
applications. The output will be energized once the delay has expired.
The Menu button is used to enter the LaserSource menu. When in remote
mode, it acts as a Local button, returning the instrument to local mode.
The large adjustment knob located on the right hand side of the unit is used to
change the set point or parameters in the menu. It also acts as a push button,
primarily as an enter button, when making changes in the menu.
There are four LEDs: a green power LED that is lit whenever the AC power is
turned on; the blue Output on LED that indicates the LaserSource is actively
controlling the laser diode; a red Error LED that indicates an error has occurred;
and a yellow Remote LED that indicates the unit is being controlled via a
computer.
Whenever an error is generated, the red Error LED will light, and the error will be
displayed on the VFD display. There may be one or more errors, but only the
first error will be displayed. To display the next error, press Menu button. To
clear all errors, press the knob. A list of error codes can be found in the Error
Messages section below.