
User Manual

Page 25 of 34
a) AUTOMATIC MENU EXIT.
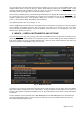
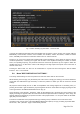
To activate or deactivate the option, first select menu USER PREFERENCES (S. 5-4 and Fig. 5-4) and position
the large colored window upon the AUTOMATIC MENU EXIT option with the ITEM buttons (up and down).
Select ON or OFF with the SELECT buttons (left or right). Finally, exit the menu with the EXIT button – this will
activate the currently selected state ON or OFF.
When the option is activated (ON), the amplifier exits the currently selected menu if no button has been
pressed for more than 5 minutes.
If the option is deactivated (OFF), the amplifier remains in the currently selected menu until operator’s
intervention.
b) activation and deactivation of option AUTO OPERATE.
The AUTO OPERATE option can be activated manually, as well as by remote commands on the RS232
interface.
To control it manually, first select the USER PREFERENCES menu (S. 5-4 and Fig. 5-4) and in it – the AUTO
OPERATE option by means of the ITEM buttons (up and down).
The option is activated or deactivated by selecting ON or OFF through the SELECT buttons (left or right).
Finally, exit the menu by pressing the EXIT button – the currently selected value will be accepted.
For the role and functioning of the AUTO OPERATE option see Sections 3-3, 4-1(c), and 4-6(b).
c) HELLO MESSAGE edit.
To compose an arbitrary text (for instance the operator's call sign), after the row HELLO MESSAGE is selected
with the ITEM button, the small pointer must be set with the SELECT button (right) on the position you wish to
be edited. Afterwards, again with the ITEM button, the symbol for this position is changed – they appear one
after another in the order of the ASCII code. Then with SELECT (right) the next symbol for editing is selected
etc. Finally, again with SELECT (left) the small pointer returns backwards until it comes out of the cells for
editing and only then with ITEM the operator can select another row (user preference - item) or the EXIT button
can be pressed – then the edited values are memorized.
d) Blocking access to Operate mode – OPERATE ACCESS.
Locking and unlocking of the Operate mode is made in the same way as for activating and deactivating of
AUTO OPERATE or AUTOMATIC MENU EXIT.
When the amplifier is locked (LOCK is selected), it remains in the Stand-by mode and cannot be turned to
Operate mode by random actions unless unlocked by the selection of UNLOCK before that. Passwords are not
used - only simple protection is envisaged against possible child actions, or involuntary switching to Operate
mode. While locked, an attempt for entering Operate mode will trigger a reminder:
“OPERATE MODE IS LOCKED”
The status of the OPERATE ACCESS option can be changed manually as well as with remote commands by
the RS232 interface.
The other two preference items need no explanation.
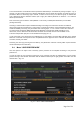
5-5. Menu "FAULTS LOG"
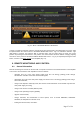
When selected from the menus list (Fig. 5), the FAULTS LOG menu provides a possibility to read or download
the information from the nonvolatile memory of the amplifier, registered at the last 28 automatic protection trips
of the type “serious failure” (HARD FAULT - S. 4-6(c)). The information can be read or pictures can be taken
from the amplifier display, or more comfortably – it can be downloaded and archived in a plain-text format file
through the RS232 interface and a computer using a standard terminal emulating program (TTY).
An exemplary view of the screen is shown in Fig. 5-5.