
Installation Instructions


Step 3. Leave release paper on back of tile, and position tiles in one quadrant of the room to determine
border tile size. Shift the starting line(s) 1/2 the dimension of the tile; i.e. shift 6" for a 12" tile to
maximize border tile size, if necessary.
Install tile
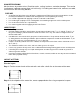
Step 4. Peel release paper from tile and install at intersection. Install one quadrant of tile at a time.
Make sure arrows on back of all tiles point in the same direction. Lay tiles in pattern shown at right,
using chalk lines as a guide. Make sure tiles are butted tightly at all edges to prevent separation.
Cutting the border tile
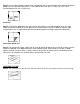
Step 5. For straight cuts place a loose tile (A) face up exactly on top of the last full tile, making sure the
arrows are pointed in the proper direction. Place another full tile (B) on top of tile (A) with its edge
against the wall. Using tile (B) as a guide, mark the face of tile (A) with a pencil. Cut border tiles with
utility knife. For irregular cuts, make a pattern and transfer it to a tile.
FINISHING THE JOB
Step 6. Roll installed tiles to bond to floor. DO NOT wash floor for five days. Replace wall base and mouldings.