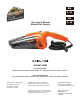
EN P. 02 ES Operator’s Manual Manual Del Usuario P. 08 AA12V1 0901 FOR YOUR SAFETY Read and understand this manual before use. Keep this manual for future reference. PARA SU SEGURIDAD Lea y entienda este manual antes de usar. Guarde este manual para futura referencia. Distributed By / Distribuido Por Cleva North America, Inc. 601 Regent Park Court Greenville, SC 29607 ©2020 Energizer Auto. Armor All is a trademark of Energizer Auto and is used under license by Cleva North America, Inc.
TABLE OF CONTENTS SECTION Page Warranty…………………………………………………………………………………………………...................... 2 Safety Instructions and Warnings………………………………………………………………….......................…. 3 Getting To Know Your Vacuum………………………………………………………………….......................……. 4 Vacuum Operation…………………………………………………………………………………......................…... 4 Cleaning And Maintenance…………………………………………………………………………......................…. 6 Troubleshooting……………………………………………………………………………………..........................
SAFETY INSTRUCTIONS & WARNINGS FOR YOUR SAFETY CAREFULLY READ AND UNDERSTAND ALL INSTRUCTIONS When using an electrical appliance, basic precautions should always be followed including the following: IMPORTANT SAFETY INSTRUCTIONS Read and understand all instructions before using this vacuum. Read and understand this owner’s manual and all labels on the Wet/Dry Vacuum cleaner before operating. Safety is a combination of common sense, staying alert and knowing how your vacuum works.
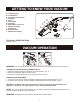
GETTING TO KNOW YOUR VACUUM A. B. C. D. E. F. G. H. I. J. K. L. 12V power plug On/Off switch Container release button LED light Filter Filter holder Container Retractable crevice tool Rubber squeegee Detail brush Storage pouch Detail brush storage G F E D C H B A L K J I TECHNICAL SPECIFICATIONS: Voltage: 12V DC VACUUM OPERATION 1 2 WARNING: Do not run the vehicle’s engine while cleaning. This can shorten the life of the vacuum. CONNECTING TO THE VEHICLE’S POWER SUPPLY 1.
2 1 6 4 3 5 8 7 OPERATING INSTRUCTIONS – DRY VACUUMING The vacuum can be used as assembled or with the crevice tool. For your convenience, the crevice tool is permanently built-in onto the top portion of the container. 1. Verify that the switch is in the OFF position before plugging in. (fig. 1) 2. Flip the crevice tool over to the fully extended position and push it into the container nozzle until secured in place. (fig. 2) 3. Insert the detail brush into the front of the crevice tool. (fig. 3) 4.
8 IMPORTANT: 1. The appliance is designed for vacuuming only small amounts of liquid. 2. STOP vacuuming if the liquid in the container reaches the “max” indicator line on the container. (fig. 8) 3. Empty it immediately before next use or storage. CLEANING AND MAINTENANCE 1 3 2 5 4 6 7 CLEANING AND MAINTENANCE WARNING: ALWAYS DISCONNECT THE PLUG FROM THE SOCKET BEFORE REMOVING THE CONTAINER FROM THE APPLIANCE. Regularly clean the filter. The filter is re-usable and should be cleaned regularly. 1.
NOTE: Make sure the vacuum is completely dry before using it again. IMPORTANT: To assure product SAFETY and RELIABILITY, repairs, maintenance and adjustments (other than those listed in this manual) should be performed by an authorized service center or other qualified service organizations, always using identical replacement parts. MAINTENANCE Use only mild soap and damp cloth to clean the vac. Never let any liquid get inside the vacuum motor area; never immerse any part of the vacuum into liquids.
ÍNDICE SECCIÓN Página Garantía ………………………………………………………………………………………………………...............8 Instrucciones y advertencias de seguridad …………………………………………………………............………. 9 Las partes de su aspiradora ……………………………………………………………………………............…...10 Funcionamiento de la aspiradora ………………………………………………………………………............….. 10 Limpieza y mantenimiento ………………………………………………………………………………............…..13 Solución de problemas …………………………………………………………………………………….............
INSTRUCCIONES Y ADVERTENCIAS DE SEGURIDAD PARA SU SEGURIDAD, LEA ATENTAMENTE Y ENTIENDA TODAS LAS INSTRUCCIONES. Al utilizar un aparato eléctrico, se deben tomar siempre las precauciones básicas, incluidas las siguientes: INSTRUCCIONES IMPORTANTES DE SEGURIDAD Lea y entienda todas las instrucciones antes de utilizar esta aspiradora. Lea y entienda este manual y todas las etiquetas de la aspiradora para polvo y agua antes de ponerla en funcionamiento.
• Mantenga el cable alejado de superficies calientes. • No use ni guarde el aparato cerca de materiales peligrosos. • No descuide la aspiradora para polvo y agua cuando esté enchufada. Desenchúfela del tomacorriente cuando no esté en uso y antes de realizar el servicio. • No la exponga a la lluvia. Guárdela en un lugar seco cuando no esté en uso. • Antes de usarlo, verifique que el aparato no tenga piezas defectuosas o dañadas.
ADVERTENCIA: No ponga en funcionamiento el motor del vehículo durante la limpieza. Esto puede acortar la vida útil de la aspiradora. CÓMO CONECTAR A LA FUENTE DE ALIMENTACIÓN DEL VEHÍCULO 1. Asegúrese de que el interruptor de la aspiradora esté en la posición OFF (APAGADO). (fig. 1) 2. Extraiga el encendedor de su alojamiento. 3. Inserte el enchufe de 12 V (A) en el tomacorriente de 12 V. (fig. 2) CÓMO PONER EN FUNCIONAMIENTO EL APARATO 1.
1 3 2 4 5 7 6 INSTRUCCIONES DE USO. ASPIRACIÓN DE LIQUIDOS La aspiradora puede usarse para levantar líquidos con o sin el escurridor (J). Para usar con el escurridor: 1. Verifique que el interruptor esté en la posición OFF (APAGADO) antes de enchufar la aspiradora (fig. 1). 2. Coloque el escurridor dentro de la abertura para el escurridor del contenedor. (fig. 2) 3. Inserte el enchufe dentro del tomacorriente de 12 V. (fig. 3) 4.
LIMPIEZA Y MANTENIMIENTO 1 3 2 5 4 6 7 LIMPIEZA Y MANTENIMIENTO ADVERTENCIA: SIEMPRE DESCONECTE EL ENCHUFE DEL TOMACORRIENTE ANTES DE EXTRAER EL CONTENEDOR DEL APARATO. Limpie el filtro periódicamente. El filtro es reutilizable y debe limpiarse en forma periódica. 1. Verifique que el enchufe esté desconectado del tomacorriente. (fig. 1) 2. Presione el botón de liberación (C) y extraiga el contenedor (G). (fig. 2) 3. Quite todos los desechos y el polvo del contenedor. (fig. 3) 4.
SOLUCIÓN DE PROBLEMAS ADVERTENCIA:PARA REDUCIR EL RIESGO DE CHOQUE ELÉCTRICO, DESENCHUFE ANTES DE INTENTAR SOLUCIONAR PROBLEMAS. Síntoma Causas posibles Acción correctiva La aspiradora no funciona. 1) No hay suministro de energía. 1) Revise el suministro de energía eléctrica: la batería del vehículo, el 2) Desenchufe y revise el cable de alimentación. Si está dañado, hágalo reparar por un profesional. 3) Vacíe el contenedor. 1) Coloque o reemplace el filtro de tela reutilizable.