
Technical data


41
NOTE:
The sharpest image will be visible only when the objective lens and eyepiece lens are properly
focused.
(5) Rotate the diopter adjustment for the clearest view of the image intensier screen.
NOTE:
Any readjustment for eye relief requires readjustment of the diopter.
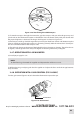
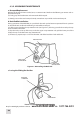
(6) Adjust the eye relief distance by depressing the side buttons (Figure 3-24) (or, if using a metal mount,
the side lever) and sliding the monocular back and forth until you obtain a full view of the image. Reset
the diopter adjustment for the best image.
(7) While observing an object, adjust the objective lens focus (Figure 3-1) until the image becomes
sharp and clear.
(8) To ip it up, grasp the helmet tilt and ip-up assembly and rotate upward and rearward until the
latch is rmly engaged.
WARNING:
The monocular will not automatically turn o when ipped up. The monocular must be turned
o using the power switch.
(9) To ip the device down, grasp the helmet tilt and ip-up assembly and rotate downward and for-
ward until the latch is rmly engaged.
(10) Turn the device ON to resume viewing.
3.4.4. WEAPONMOUNTED OPERATION
NOTE:
The MUNVM can be used in conjunction with a collimated dot aiming device mounted on the
forward mounting rail. The brightness control for the aiming device should be set at or near its
minimum setting.
Perform the following procedures for weapon-mounted operation:
(1) Verify that the batteries are installed per paragraph 3.3.2.
(2) Attach the weapon mount to the monocular per paragraph 3.3.10, steps 1 and 2.
(3) Mount the monocular, with the adapter, to the M16/ M4 receiver rail, per paragraph 3.3.10, steps 3
and 4.
(4) Rotate the diopter adjustment for the clearest view of the image intensier screen.
(5) While observing an object, adjust the objective lens focus (Figure 3-1) until the image becomes
sharp and clear.
Shop for Armasight products online at:
1.877.766.5412
www.SCOUTBASECAMP.ca