
Manual


41
WARNING:
The monocular will not be turned o automatically when ipped up. The monocular must be
turned o by the power switch.
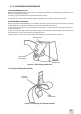
(9) To ip down, grasp the helmet tilt and ip-up assembly and rotate downward and forward until the
latch is rmly engaged.
(10) Turn the power switch to the ON position to resume viewing.
3.4.4. WEAPON MOUNTED OPERATION
NOTE:
The MUNVM can be used in conjunction with a collimated dot aiming device mounted on the
forward mounting rail. The brightness control for the aiming device should be set at or near it’s
minimum setting.
Perform the following procedures for weapon mounted operation:
(1) Ensure that the battery are installed per paragraph 3.3.2.
(2) Assemble the weapon mount to the monocular per paragraph 3.3.10, steps 1 and 2.
(3) Mount the monocular with adapter onto the M16/M4 receiver rail per paragraph 3.3.10, steps 3 and
4.
(4) Rotate the diopter adjustment for the clearest view of the image intensier screen.
(5) Adjust the objective lens focus (Figure 3-1) while observing an object until the sharpest image is
obtained.
3.4.5. IR SOURCE OPERATIONS
WARNING:
The IR source is a light that is invisible to the unaided eye for use during conditions of extreme
darkness. However, the light from the IR source can be detected by the enemy using night vi-
sion devices.
NOTE:
The purpose of the IR source is for viewing at close distances up to 3 meters when additional
illumination is needed.
(1) Pull the power switch knob out and rotate clockwise to the IR position. With the monocular held to
the eye, observe that a red light appears in the eyepiece. This indicates that the IR source is operating.
(2) For momentary IR, turn the power switch clockwise (without pulling) past the ON position. Observe
that a red light appears in the eyepiece.
3.4.6. OPERATION WITH COMPASS
WARNING:
The compass illuminator can be seen by others using night vision devices.