
Manual


33
NOTE:
After installing the monocular, minor strap adjustments may be necessary to achieve comfort.
(8) Install the headmount/helmet mount adapter (refer to paragraph 3.3.7).
(9) Refer to paragraph 3.4.2. for operating procedures.
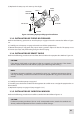
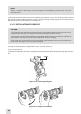
3.3.7. INSTALLATION OF HEADMOUNT/HELMET MOUNT ADAPTER
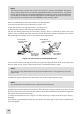
Install the headmount/helmet mount adapter (Figure 2-1) into the monocular by aligning thumbscrew
to hole and tightening as shown in Figure 3-10. There is an alignment boss on the headmount/helmet
mount adapter that ts into a groove on the monocular. Make sure the boss on the adapter ts into the
groove on the monocular.
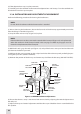
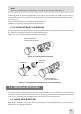
3.3.8. INSTALLATION OF HELMET MOUNT TO HELMET
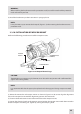
(1) Remove the helmet mount from the carrying case. Refer to Figure 3-11 for helmet mount features.
(2) Press the release (Figure 3-12) to remove the mount from the helmet mount bracket.
(3) Make sure the strap is laced onto the helmet mount bracket as shown in Figure 3-12.
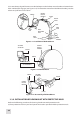
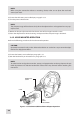
(4) With catch (see Figure 3-12) in forward most position, place the strap over the top of the helmet
center (see Figure 3-13).
(5) Hook the rear bracket (see Figure 3-12) on the center of the back of the helmet and lay the strap with
helmet mount bracket over the top of the helmet.
(6) Hook the helmet mount bracket in the center of the front lip of the helmet and hold it in place (see
Figure 3-13).
(7) With the buckle lever open, take up the slack in the strap using the catch. Close the buckle lever.
(8) Disengage the nape strap latch on the left side of nape strap.
(9) Don the helmet. Do not fasten the helmet chinstrap.
(10) Engage the nape strap at the nape strap latch. Tension the nape strap for a stable t, then install
and tension the helmet chinstrap. The brow of the helmet should be parallel to the ground and the
helmet stable on the head.
LATCH
ALIGNMENT BOSS
(HIDDEN)
ALIGNMENT BOSS
GROOVE
THUMBSCREW
Figure 3-10. Headmount/Helmet Mount Adapter Installation