
Manual

28
NOTE:
Make sure the shading is not the result of improper eye-relief adjustment (refer to paragraph
3.4.2).
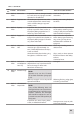
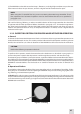
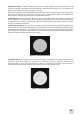
(2) Edge Glow. Edge glow is a bright area (sometimes sparkling) in the outer portion of the viewing
area (see Figure 3-4).
To check for edge glow, block out all light by cupping a hand over the objective lens. If the image inten-
sier is displaying edge glow the bright area will still show up. Return the MUNVM to the maintainer.
(3) Flashing, Flickering, or Intermittent Operation. The image may appear to icker or ash. If there
is more than one icker, check for loose battery cap or weak battery. If weak or loose batteries are not
the problem return the MUNVM to the maintainer.
c. Cosmetic Blemishes
These are usually the result of manufacturing imperfections that do not aect intensier reliability and
are not normally a cause for rejecting an MUNVM. However, some types of blemishes can get worse
over time and interfere with the ability to perform the mission. If you believe a blemish is cause for
rejection, record the specic nature of the problem on the maintenance forms and identify the posi-
tion of the blemish by using the clock method and approximate distance from the center (e.g., 5 o’clock
toward the outside, 2:30 near the center, or 1:00 midway). The following are cosmetic blemishes:
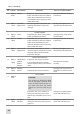
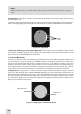
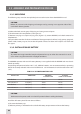
(1) Bright Spots. A bright spot is a small, nonuniform, bright area that may icker or appear constant
(Figure 3-5). Not all bright spots make the MUNVM rejectable. Cup your hand over the objective lens to
block out all light. If the bright spot remains, return the MUNVM to the maintainer. Bright spots usually
go away when the light is blocked out. Make sure any bright spot is not simply a bright area in the scene
you are viewing. Bright spots are acceptable if they do not interfere with the operator’s ability to view
the image or to perform the mission.
EDGE
GLOW
Figure 3-4. Edge Glow
EMISSION POINTS
BRIGHT SPOTS
Figure 3-5. Bright Spots and Emission Points