
Manual

26
NOTE:
• The resolution test must be performed in a darkened area. Your eyes must be dark-adapted to
perform this test. Review the following test procedure before entering the dark area.
• Expect cosmetic blemishes, such as chicken wire, black spots, and xed-pattern noise, to stand
out while viewing through the TS-4348/UV Test Set when it is on the high light level. This is
acceptable.
• The rejection of any MUNVM for cosmetic defects must be based on an outdoor evaluation
and not the TS-4348/UV Test Set.
b. Low Light and High Light Resolution Test Procedure
Test the monocular for low light and high light resolution performance according to the following
steps.
(1) Place the HIGH/LOW switch on the test set to the LOW position.
(2) Turn o the room light and let your eyes adjust to the dark.
(3) Turn on the test set by setting the “II/OFF/III” switch to the “III” position.
(4) Turn on the monocular and insert it into the test port on the test set.
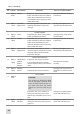
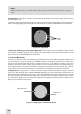
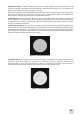
(5) Look through the monocular and view the projected pattern (see Figure 3-2). If necessary, focus the
eyepiece lens and then the objective lens to obtain the sharpest image.
(6) The MUNVM monocular must be able to resolve Group 2, Element 2, under low light conditions to
pass the test. If the MUNVM does not pass the test, return it to maintenance for repair. The operator
must document resolution failures on the maintenance record.
NOTE:
For a pattern to be resolvable, three vertical bars and three horizontal bars must be visible.
(7) Flip the HIGH/LOW switch to the HIGH position.
(8) Again, look through the monocular and view the projected pattern (see Figure 3-2). If necessary,
refocus the objective lens and then the eyepiece lens to obtain the sharpest image.
NOTE
THE TARGET SHOWN IS FOR EX-
AMPLE ONLY AND IS NOT DRAWN
TO SCALE.
GROUP NUMBER
ELEMENT NUMBERS
READ THIS FOR LOW
LIGHT RESOLUTION
FOR MUNVM
READ THIS FOR
HIGH LIGHT
RESOLUTION
FOR MUNVM
1
1
1
1
2
2
2
3
4
5
6
5
2
3
4
5
6
6
4
2
3
4
5
6
3
2
3
4
5
6
5
1
1
4
Figure 3-2. TS-4348/UV Test Set Pattern