INSTRUCTION MANUAL Wicker Fire Pit Table
As shoppers, we’re always trying to find the perfect balance between quality&value.We believe we’ve achieved that. Our diverse catalog of everyday essentials is tailored especially to our customers & guaranteed to hit that sweet spot of high quality & low price. Always.
WARNING Do not use this product directly on a wood deck or near a side wall. IF YOU SMELL GAS • Do not attempt to light appliance. • Extinguish flames and disconnect the tank. • Move people away from the immediate area.
WARNING Do not allow the gas hose to contact the burner or fire bowl. IF YOU SMELL BURNING RUBBER • Extinguish flames and disconnect the tank. • Move people away from the immediate area.
NOTICE • • • • • • • • • • • • • • Please retain these instructions for future reference. For outdoor use only; do not use in a building, garage, or any other enclosed area. Fire pit operates at reduced efficiency in temperatures below 40°F or wind velocity higher than 10 mph. Only use this appliance on a hard and level surface such as concrete or rock. Do not use on plastic composite or artificial wood decks. For use with propane gas tanks only (not included).
PROPANE TANK WARNINGS • Make sure to organize fuel hose to prevent accidental tripping. • Only use standard 20-pound propane tanks. • Maximum gas supply pressure is 250 PSI. • Do not fill tank more than 80% of its capacity. • Do not use tank if any part of it is damaged; rust and dents can be dangerous. • Propane tank must have a collar to protect the gas valve. • Using too much propane gas may result in gas pooling and will not burn.
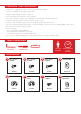
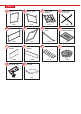
PARTS A BACK B 1 PC E LEFT SIDE GLASS SHORT PANEL F BURNER UNIT 1 PC TANK SEAT FRAME DOOR J GLASS LONG PANEL 2 PCS N COVER 1 PC D 1 PC G 1 PC 2 PCS M C 1 PC 1 PC I RIGHT SIDE DOOR SUPPORT (L/R) 1 PC H 2 PCS K 1 PC TABLETOP WITH BURNER 1 PC L LID TANK SEAT SUPPORT FIRE GLASS 1 SET
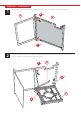
PRODUCT ASSEMBLY 1 Attach part B right side to part A back with two part 2 screws and two part 4 washers. 2 A 4 2 x2 B x2 Attach one side of the part C tank seat frame and part D tank seat support with two part 2 screws, a part 1 screw, and three part 4 washers.
PRODUCT ASSEMBLY 3 Attach part E left side to the back with two part 2 screws and two part 4 washers. Attach the other side of the tank seat frame and tank seat support with two part 2 screws, a part 1 screw, and three part 4 washers. E 1 2 4 4 x4 x5 Pull out the tank seat frame and attach the part F door with two part 3 screws and two part 4 washers.
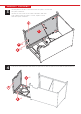
PRODUCT ASSEMBLY 5 Attach two part G door supports (L/R) with two part 1 screws, two part 2 screws, and four part 4 washers. 1 x2 2 G x2 4 6 Carefully flip the table base over and attach it to the part H tabletop with six part 2 screws and six part 4 washers. Flip table onto its base.
PRODUCT ASSEMBLY 7 Locate the part M burner unit and insert into the tabletop cavity. Make sure the burner control panel fits in the opening on the side of the table (see diagram below) M 8 Secure the burner unit with four part 7 burner screws and four part 8 burner washers.
PRODUCT ASSEMBLY 9 Slide four part 6 brackets with feet onto two part I glass short panels. Secure the brackets to the short panels by tightening four attached screws. I 6 10 x4 Slide two part J glass long panels onto the brackets. Secure the brackets to the long panels by tightening four attached screws. J 11 x2 x2 Slide four part 5 brackets onto the top of the glass panels. Secure the brackets by tightening eight attached screws.
PRODUCT ASSEMBLY 12 Place the part L fire glass (see Placing Fire Glass section) and glass panels. L 13 Place the part K lid. NOTE: Hang lid on hangers when not in use.
DIAGRAM BURNER GUARD CONTROL PANEL HANGERS FUEL HOSE REGULATOR COUPLING NUT PLACING FIRE GLASS • Place fire glass in fire pit and spread them according to your preference. - You may place fire glass on burner but do NOT cover the guard. • Excessive fire glass will suffocate the flame.
INSTALLING PROPANE TANK 1 NOTE: Only use standard 20-pound propane tanks. Slide open door and place propane tank on the tank seat frame. Turn wingnut clockwise to secure tank. Make sure release valve on tank is firmly screwed shut. 2 Attach fuel hose regulator to the output of the tank by turning the coupling nut clockwise. - If door does not close, readjust position of tank and hose until door closes. 3 Turn release valve on tank counterclockwise to release gas.
INSTALLING BATTERY 1. Unscrew igniter button. 2. Insert AAA battery with the positive side facing outwards. 3. Replace igniter button. NOTE: If the burner is not lighting, you may need to replace the battery in the igniter.
OPERATING INSTRUCTIONS NOTE: Before use, inspect burner, propane tank, and connectors for damage, debris, obstructions, or dirt. Do not operate if there is any blockage. 1. Push and turn control knob counterclockwise to low/ignite. 2. Press the ignitor button repeatedly to light burner. - If flames do not ignite after 45 seconds, turn off, wait 5 minutes, and try again. - If necessary, keep control knob pushed in while pressing ignitor button. - If necessary, carefully light burner with a match or lighter.
TROUBLESHOOTING PROBLEM Burner not lighting with igniter Burner does not light Emits a lot of black smoke REASON SOLUTION Guard obstructed Clear guard of obstructions Burner wet Dry burner Igniter battery dead Replace battery in igniter Propane tank is empty Replace/refill tank Coupling nut loose Fully tighten coupling nut Bent hose Straighten hose Burner holes obstructed Remove obstructions or clean holes Control knob off Turn control knob on Bent hose Straighten hose Burner holes o
CHAT US! Chat Support Product Inquiry Orders FAQ Product Assembly Returns & Refunds PRODUCT WARRANTY INFORMATION All items can be returned for any reason within 60 days of the receipt and will receive a full refund as long as the item is returned in its original product packaging and all accessories from its original shipment are included. All returned items will receive a full refund back to the original payment method. All returned items will not be charged a re-stocking fee.