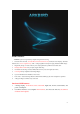
Product Features: ARKBIRD System is a high-accuracy autopilot designed for fixed-wing: 1. Function all in one broad, on broad IMU (Inertial measurement unit), OSD (On Screen Display), barometer Attitude sensor, 12V-5V regulation chip, “ESC + voltage regulation” dual power supply. Industrial reliable design. 2. Plug & Play design, no need to weld any wire, Adjust parameters by OSD menu and radio stick. 3. Intelligent PID controller. Easy to adjust, support delta-wing. 4.
Warning: Read this manual carefully before use! Pay attention to important detail and parameters! Use “ctrl+F” to search this document to locate information, eg. ”neutral check”. 1. Wiring.---Page 3. 2. Power Supply:---P4 3. Installation: ---P6 4. Switch Modes through CH5 and CH6: ---P7 5. GPS & Save Home Position: ---P9 6. Flight OSD Interface---P9 7. Manual Mode: ---P10 8. Reverse Balance Mode assistant Control: ---P 10 9. GPS and Return to Home Instruction---P11 10. OSD and Menu ---P12 11.
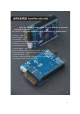
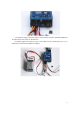
1. Wiring Use 3P wires “black (ground), red (power), white (data)” (Note the polar of camera wire, DO NOT POWER ON before carefully check.
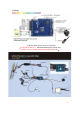
2. Power Supply Recommend using one single 3S (12V) battery to supply flight power and Arkbird OSD12V, Video TX & camera (Shared supply), Otherwise, use one battery (2S-6S) to supply flight power, another 3S battery to supply OSD 12V&Video (Separated supply). Power Supply Diagram Arkbird sensor’s 3P wire can wire in the flight power. 1. If 3S battery, plug in the jumper (Default), it will supply power to 12V Video system (Arkbird OSD 12V, Video TX & camera).
2. If separated supply, remove the jumper, connect another 3S battery (800mah-1000mah) to the Video Power Port (12Vin) on the third row. If separated supply, the sequence to power on is OSD 12V first, and then ESC flight power. Otherwise, the OSD cannot initialize and display.
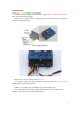
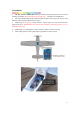
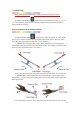
3. Installation: 1. The pins of Servo & Radio RX shall stay forward (toward flying direction), the side with soldering dot shall be upward or Vertical toward right wing. (Default is level installation) 2. Put on heat-shrink tubing, fix by sponge and cable tie. Please keep away from motor to avoid vibration which will reduce the accuracy of sensor. 3. While using on flying wing, connect channel 1 output to right servo and connect channel 2 output to left servo.
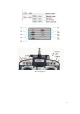
2 ways of installation 4. Switch Modes through CH5 and CH6: 1. After installation, test OSD and the radio control. Use CH5 and CH6 (0% to 100%) to switch flight mode. ), 2. While CH5 < 50%, it switches to Manual Mode(OSD shows 3. While CH5 > 50% and CH6 < 30%, it switches to Balance Mode(shows ); While CH5 > 50% and 30% < CH6 < 70%, it switches to Custom Mode(Way point Mode or Fence Mode), While CH5 > 50% and CH6> 70%, it switches to Return-to-home Mode.(shows ).
(Pos and Negative) -8-
5. GPS & Save Home Position After power on, Arkbird will start to search GPS satellite and save the first valid position as Home. During searching, the elevator will be up and any manipulation of radio stick is invalid. If need to skip the searching, please push CH6 more than 75% and push CH1 to left or right side for 1 second. Once skipped the searching, it CANNOT switch to RTH mode, RTH logo will flash but it is balance mode. 6. Flight OSD Interface 1.
7. Manual Mode Radio Stick and SUB-TRIM back to center, set radio travel range as 100%. Switching to Manual Mode , Arkbird will not participate control, set manual control’s reverse through radio, adjust plane’s CG and travel angle, make sure plane can fly stably in horizontal without Autopilot. 8.
3. Rudder: When yawing the plane to right, rudder shall produce a left compensation automatically. On the contrary, when yawing to left, rudder will produce a right compensation. If the compensation direction is not correct, please move the Dip switch 3 to the other side. 9. GPS and Return to Home Instruction While switching to RTH Mode (CH5 to 100% and CH6 to 100%), it will adjust the flying height to safe height to go home.
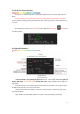
10. OSD and Menu CH5 switches to Manual Mode(<50%), throttle to 0%, and push CH1 to left or right side for 6 seconds, it will enter into main menu. Exit the main menu if CH5 switches to auto mode(>50%). Moving stick up and down to change the value, pushing to right side to select, and pushing to left side to exit and save parameters.
Main Menu: "Set HOME" --------- Save home position "Set CTL Parameters" --------- Set CTL Parameters "Set RTH Parameters" --------- Set RTH (Return to Home) Parameters "Set OSD Parameters" --------- Set OSD Interface "------------------------------------------------------------------------------------------------------------" "Flight Parameters" --------- Reverse and delta-wing mixing "Fence Area Set" --------- Set Fence Mode Area "Way Point Set1" --------- Set Way Point Mode1 "Way Point Set2" --------- Set
"Lock Dir/Heig" ---------Lock direction and height (Cruise flight): "ON":Under balance mode, when CH1 and CH2 stick back to center, height and direction will be locked and keep straight & constant-height flight. OSD shows . Aileron and elevator can also be controlled through CH1 and CH2. "OFF": Turn off the mode. Set RTH Parameters "Max Roll" ---------Max roll angle while return to home, 20 to 40 degree recommended.
"P or N(Xin)" --------- PAL/ NTSC selection Flight Parameters Note: Adjusting these four parameters is equivalent to adjusting the Dip switch. "Roll (KEY1)" ---------Roll Reverse "Pitch (KEY2)" ---------Pitch Reverse "Yaw (KEY3)" ---------Yaw Reverse "FlyWing (KEY4)" ---------Conventional/ Delta Wing Fence Area Set Switching to CH5 > 50% and 30 %< CH6< 70%, within rectangle area and above safe height it is Balance Mode, otherwise it switches to RTH mode.
Way Point Set Set four way points (WP1~WP4), allow to turn on/off separately. Set Custom Mode as Way Point Mode(CH5 > 50% and 30 %< CH6< 70%). The plane will fly in a loop upon the sequence of 1 to 4, skip the waypoint turned off, and return to home while over the safe time. "WP safe time" ---------WP safe time. Returning to home if reachs the safe time. Re-timing only next power-on.
11. Balance Mode and RTH Adjustment (Very Important) Arkbird’s default parameters will be ok for most plane types. But if the most ideal situation expected, please refer to the following methods: First time installation, do a neutral point alignment. Plane shall be put paralleled to the ground before neutral point check, moving aileron stick left and right to get start.
Adjusting Return to Home Mode: 1. Switch to RTH Mode, Important parameters “Home Direction,” “Roll Angle,” “Pitch Angle,” and “RTH Throttle” shown on OSD shall be checked all the time. Flying to certain height, switch to RTH Mode and check if these data are appropriate. 2. Adjust RTH parameters referring to these values. If the roll angle is too small to return promptly, please increase the Max Roll.
inferior Video TX’s antenna will affect GPS, too. GPS can only work Outdoors, First time about 5-10 minutes, next power on of the same day it would take less than 10seconds to locate. Q: Plane tilts under Balance Mode / Manual Mode, can I adjust the radio TRIM A: First time installation, do a neutral point alignment. Radio stick and SUB-TRIM back to center, adjust plane’s CG and travel angle to make plane balanced.