USER MANUAL Electric Fireplace Model # SF105-23G THIS INSTRUCTION BOOKLET CONTAINS IMPORTANT SAFETY INFORMATION. PLEASE READ AND KEEP FOR FUTURE REFERENCE.
Table of Contents Safety Information..................................................................................3 Pre-installation.......................................................................................6 Assembly......................................................................................7 Operation.........................................................................................8 Using the Remote Control...................................................................
Safety Information IMPORTANT SAFETY INFORMATION PLEASE READ ALL OF THE INFORMATION IN THIS OPERATING MANUAL, INCLUDING ALL SAFETY, OPERATING, AND MAINTENANCE INFORMATION. TO AVOID THE POTENTIAL RISK OF FIRE, ELECTRIC SHOCK, OR INJURY TO PERSONS, USERS SHOULD FOLLOW THE DIRECTIONS AND WARNINGS IN THIS MANUAL 1. Read all instructions before using this heater. 2. Do not use this heater outdoors. 3. This heater is not intended for use in bathrooms, laundry areas and similar indoor locations.
SAVE THESE INSTRUCTIONS WARNING There are no user serviceable parts inside the replace/heater, If the unit appears to malfunction, turm the unit offand unplug the unit from the wall immediately, and contact Customer. ! WARNING This heater is hot when in use.To avoid burns, do not let bare skin touch hot surfaces. If provided,use handles when moving this heater, Keep combustible material, such as furniture,pillows, bedding, papers,clothes and curtains at least 3 f.t(0.
Safety Information (continued) GROUNDING INSTRUCTIONS ! DANGER Improper connection of the equipment-grounding conductor can result in a risk of electric shock. Check with a quali ed electrician or serviceman if you are in doubt as to whether the product is properly grounded. Do not modify the plug provided with the product. If it will not t the outlet, have a proper outlet installed by a quali ed electrician. This product must be grounded.
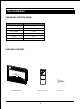
Pre-installation TECHNICAL SPECIFICATION Model Number Description Dimensions(WxDxH) 24.2”x5.1”x17.5” Net Weight 12.6 Ib Gross Weight 14.
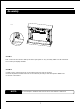
Assembly ● STEP 1 Take out the unit from the box and layout all the spare parts for easy assembly. Make sure all small items are not left in packaging materials. ● STEP 2 Carefully set the unit from the back of the mantel and center it in the opening. Check the alignment and attach the unit of the mantel by inserting screws through the drilled holes on the trim of the mantel. NOTE: Do not attempt to install the unit from the front of the mantel. It will not t.
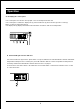
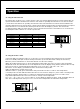
Operation ● Identifying the control panel •The control panel is located on the top right corner of the replace/heater unit. •The control panel contains the display unit (1), function indicator (2), timer function (3),heater control (4), ames control (5), and main power(6). •The display unit (1) displays information about the ame level,timer, and current temperature. ● Understanding the function indicator •The function indicator (2) has three square LEDS -red, green,and blue.
Operation ● Using the timer function The timer button (3) allows you to set the amount of time you want the replace/heater to run.The timer button (3) operates both the ames and the heater function. if the heater is operating when the timer is set, then the heater is on the timer. if the ames are operating, then the timer will control the ames. if both the heater and ames are operating with the timer set ,then the timer controls both the ames and the heater.
Operation ● Using the ame control •Press the ame button (5) to set the ames for different levels of ame height. These ame levels are shown in the display (1).
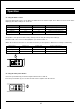
Using the Remote Control Main Power Heater Control Flame Control Heater Down Time Control Heater Up ● Using the Remote control The operation of the remote control buttons work the same as button on the control panel. NOTE: The remote control cannot be used to switch between degree Fahrenheit and degree Celsius. ● Install the battery For replacement batteries, use AAA batteries. Press down and slide back cover off the battery compartment.
Care and Maintenance ! ! WARNING Always disconnect from the power supply before cleaning the heater. First turn off the main power. Then remove the electrical plug from the wall outlet. WARNING Do not use this replace insert if any part of it has been under water. Immediately call a quali ed service technician to inspect the rebox and replace any part of the electrical system which has been underwater.
Troubleshooting Problem Solution The unit does not turn on. Check that the unit is fully plugged into a standard 120 V outlet. Press the power button on the control panel. The unit is on, but there is no ame effect. Open the back panels to check if the ame spindle has fallen off from the spindle motor. There is a visible ame effect, but the heater does not continue to blow warm air after repeatedly turning on the heater.