
Technical data


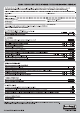

12
COMMISSIONING
At the time of commissioning, please ensure all
relevant sections of the Benchmark Checklist,
located on Page 17 and 18 of this document, are
completed.
FILLING THE UNIT WITH WATER
• Check expansion vessel pre-charge pressure.
The vessel is supplied precharged to 3.5 bar to
match the control pressure of the pressure re-
ducing valve. The precharge pressure is checked
using a car tyre gauge by unscrewing the plastic
cap opposite the water connection.
• Check all connections for tightness including
the immersion heater(s). An immersion heater
key spanner is supplied for this purpose.
• Ensure the drain cock is CLOSED.
• Open a hot tap furthest from the CENTERSTORE
cylinder.
• Open the mains stop cock to fill the unit.
When water fl ows from the tap, allow to run for
a few minutes to thoroughly fl ush through any
residue, dirt or swarf, then close the tap.
• Open successive hot taps to purge the system
of air.
SYSTEM CHECKS
• Check all water connections for leaks and
rectify as necessary.
• Turn off mains water supply.
• Remove the pressure reducing valve head
work to access the strainer mesh, clean
and re-fi t.
• Manually open, for a few seconds, each
relief valve in turn, checking that water is
discharged and runs freely through the
tundish and out at the discharge point.
• Ensure that the valve(s) reseat
satisfactorily.
Fill the indirect (primary) circuit following the boiler
manufacturer’s commissioning instructions. To ensure
the CENTERSTORE cylinder primary heat exchanger
is fi lled, the 2 port motorised valve (supplied) should
be manually opened by moving the lever on the mo-
tor housing to the MANUAL setting. When the
primary circuit is full return the lever to the
AUTOMATIC position. Switch on the boiler, ensure
the programmer is set to Domestic Hot Water and
allow the CENTERSTORE cylinder to heat up to a
normal working temperature (60
o
C recommended,
approximately graduation 4 on the thermostat). If
necessary the temperature can be adjusted by
inserting a fl at bladed screwdriver in the adjustment
knob (located on top of the thermostat mounting
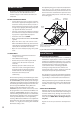
bracket - see Fig.10) and rotating. The minimum
thermostat setting is 10°C.
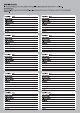
Fig. 10: Indirect thermostat and thermal cut-out
THERMAL
CUT-OUT RESET BUTTON
THERMOSTAT
ADJUSTMENT
THERMOSTATTERMINAL BLOCK
CABLE
CLAMPS
THERMAL
CUT-OUT
NOTE: THE HOUSING COVER AND
ELEMENT ASSEMBLY HAVE BEEN REMOVED
FROM THIS VIEW FOR CLARITY
The adjustment range 1 to 5 represents a temperature
range of 30
o
to 70
o
C. Check the operation of the
indirect thermostat and 2 port motorised valve and
that no water has issued from the expansion relief
valve or temperature/pressure relief valve during
the heating cycle.
MAINTENANCE
MAINTENANCE REQUIREMENTS
Unvented hot water systems have a continuing
maintenance requirement in order to ensure safe
working and optimum performance. It is essential
that the relief valve(s) are periodically inspected and
manually opened to ensure no blockage has
occurred in the valves or discharge pipework.
Similarly cleaning of the strainer element and
replacement of the air in the expansion vessel will
help to prevent possible operational faults.
The maintenance checks described below should be
performed by a competent person on a regular basis,
e.g. annually to coincide with boiler maintenance.
After any maintenance, please complete the relevant
Service Interval Record section of the Benchmark
Checklist located on Page 17 and 18 of this docu-
ment.
SAFETY VALVE OPERATION
Manually operate the temperature/pressure relief
valve for a few seconds. Check water is discharged
and that it fl ows freely through the tundish and
discharge pipework. Check valve reseats correctly
when released. NOTE: Water discharged may be
very hot!
Repeat the above procedure for the Expansion
Valve.