
Installation Instructions


25
GB
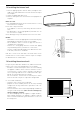
10 m max
VACUUM PUMP
SERVICE CONNECTION
GAS VALVE
SERVICE
CONNEC-
TION
LIQUID
VALVE
COCK
PROTECTION
CAPS
3 m
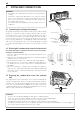
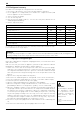
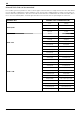
TIGHTENING TORQUE FOR THE FLANGE CONNECTIONS
Pipe Tightening torque
[kgf x cm]
Corresponding effort
(using a 20 cm spanner)
6.35 mm (1/4”) 160 - 200 wrist force
9.52 mm (3/8”) 300 - 350 arm force
12.70 mm (1/2”) 500 - 550 arm force
15.88 mm (5/8”) 630 - 770 arm force
TIGHTENING TORQUE FOR PROTECTION CAPS
Tightening torque [kgf x cm]
Service connection 70-90
Protection caps 250-300
IMPORTANT CHECK FOR ANY REFRIGERANT LEAKS
Once you have made the connections, open the cocks so that the gas fi lls
the piping and always check all piping against leaks using a leak detector
(risk of personal injury from cold burns).
LENGTH OF THE PIPING
The maximum length of the connection piping varies according to the mod-
el. When the piping is longer than 5 m, pay attention to the quantity of re-
frigerant that should be added for each metre. Should the external unit
have to be installed higher up than the internal unit with a difference in
height of more than 3 m, then traps should be fi tted on the return piping so
that the oil trickling down the pipe walls deposits in the trap until the latter
is full. The oil plug that forms will be shot upwards by the gas.
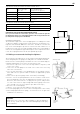
2.9 Making a vacuum and checking the tightness
The air must be expelled from the circuit using a vacuum pump, pump tran-
sition fi tting and pressure gauge assembly which are suitable for R410A.
Ensure that the vacuum pump is fi lled with oil to the level indicated by the
oil gauge and that both cocks on the external unit are shut:
1. unscrew the caps on the cocks of the two-way and three-way valves, and
on the service valve;
2. connect the vacuum pump to the small service valve in the three-way
valve of the external unit;
3. once you have opened the corresponding valves on the pump, start the
latter and leave it to operate. Make a vacuum for approximately 20/25
minutes;
4. make sure the pressure gauge shows -0.101 MPa (-760 mmHg);
5. shut the cocks on the pump and turn it off. Check that the needle on the
pressure gauge does not move for approximately 5 minutes. If the nee-
dle moves, this means that air is seeping into the system, and you must
check all connections are tight enough and that the piping connections
were all made correctly; then repeat the procedure from step 3;
6. disconnect the vacuum pump;
7. open the cocks on the two-way and three-way valves fully;
8. screw the plug tightly to the service outlet ensuring that it is well sealed;
9. after having tightened all the plugs, check that there are no gas leaks
around their circumference.
WARNING:
Always protect the connection cables and pipes to prevent damage to
them, as they could cause gas leaks when damaged (personal injury
from cold burns).