
User Manual

Rev. 0040808000 0808 Page 15
Operating and installation instructions
CONA
®
All-in-one
8.0 Troubleshooting
In the event of malfunction or faulty operating performance check that the installation and
adjustment work has been carried out and completed in accordance with these Operating
Instructions.
If malfunctions cannot be eliminate with the help of the following table
“9.0 troubleshooting table”, the supplier or manufacturer should be consulted.
9.0 Troubleshooting table
-
ATTENTION !
It is essential that the safety regulations are observed when identifying faults.
ATTENTION !
- refer to item 10.0 and 11.0 prior to dismantling and repair work!
- refer to item 6.0 before restarting the plant !
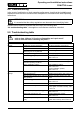
Fault Possible cause Corrective measures
No flow Installed in wrong flow direction Fit valve in direction of flow arrow
Flange covers not removed Remove flange covers
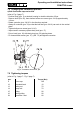
at series 63A:
Ball float (pos. 24.16) defective
Check lifting force
Little flow Piping system clogged Check piping system
Strainer clogged (pos. 2) Clean / replace strainer;
refer to item 7.4
Wrong controller size choosen Correct selection acc. to flow diagram
Changed upstream pressure or back
pressure operating conditions
Correct selection acc. to flow diagram
Wrong installation position Note installation position;
refer to item 5.3!
Correct installation position;
refer to item 7.5
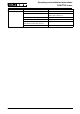
No closure, or internal
leakage
Shut-off valve clogged Clean shut-off valve; refer to item 7.1
Shut-off valve worn Replace shut-off valve; refer to item 7.1
Shot-off valve operated above safe oper-
ating pressure
Observe operating limits as per data
sheet
Controller clogged Clean strainer and controller;
refer to item 7.4
Controller worn out Replace controller; refer to item 7.4
Controller incorrectly screwed into body Check seal face between body and con-
troller, tighten controller correctly ; refer
to item 7.6
Diaphragm capsule (pos. 4) clogged Clean strainer and diaphragm capsule;
refer to item 7.4
Diaphragm capsule worn out Replace diaphragm capsule;
refer to item 7.4
Seat (pos. 3) incorrectly screwed into
body
Check seal face between body and seat,
tighten seat correctly; refer to item 7.6