
User Manual

Page 14 Rev. 0040808000 0808
Operating and installation instructions
CONA
®
All-in-one
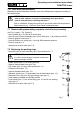
7.5 Changing the installation position
a) Ball float steam traps series 63A
(refer to Fig. 6 page 7)
- Position body (pos. 1) as desired, bearing in mind the direction of flow.
- Remove hood (Pos 16), then slacken hollow-core screw (pos. 24.10) approximately
1/2 turn.
- Rotate controller (pos. 24) 90° in the direction required.
- Always fit controller (pos. 24) so that the ball float (pos. 24.16) can work in the vertical
plane.
- Tighten hollow-core screw (pos. 24.10).
- Inspect and if necessary replace body seal (pos. 17).
- Put on hood (pos. 16) with drain plug (pos. 50) pointing down.
- Fit cheese head screws (pos. 27) (see 7.5) and tighten crosswise.
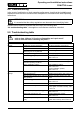
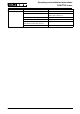
7.6 Tightening torques
(refer to Fig. 3 page 7 - Fig. 6 page 7)
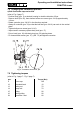
Fig. 9: Controller series 63A, kpl.
pos. Torque (Nm)
6 Screw cap 100
12 Threaded bush 10
13 Safety nut 70
14 Banjo bolt 70
15 Fitting 90
16 Stem guiding 90
24 Controller / seat 80