
Assembly Instructions

Instructions for use
Installation
Important
Maintenance
• Read these instructions carefully and familiarize yourself with the procedure before assembling the unit.
• Take all the components and fittings out of the plastic bag and separate them into their groups.
• Ensure you have enough space to lay out all the parts before assembly.
• To avoid scratching it is recommended that you assemble the unit on a soft level surface.
• The luminaire is designed for indoor use only.
• When changing the bulb, always switch off at the mains and allow the old bulb to cool down before handling.
Dispose of used bulbs carefully.
• Always be sure to use the correct type and wattage of bulbs as indicated on the fitting. Never exceed the
wattage stated.
This fitting is designed for indoor use only and must be fitted to a DRY SURFACE as any dampness in plaster or paint
can damage the finish. Do not use polish or abrasive cleaner - just a soft dry cloth.
BULB REPLACEMENT
1. Switch off the mains power supply.
2. Before replacing the bulb, allow it to cool down for at least 10 minutes.
3. Never touch the bulb with your fingers directly, cover it with a cloth.
4. Loosen the bulb and remove it from the lamp.
5. Replace a new bulb with same voltage and wattage (Max. 60W).
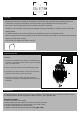
1. The shade is designed for ES fitting, for smaller BC fitting,
slot the “C” shaped lamp shade reducer ring into the centre
hole of the lamp shade.
2. Remove the lower section of the household lamp holder.
3. Place the lamp holder inside the centre of the shade and
replace the lower section of the lamp holder.
4.
Fit the bulb to the lamp holder, type and wattage as
indicated on the fitting. The wattage indicated must not be
exceeded.