
Assembly Instructions
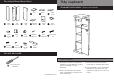

Assembly instructions
Stage 2 - Attaching the doors
Safety Instructions
8. Attach the fixed section of two
hinges to the upper door using the
small screws. Attach a door catch
to the top, using two medium
screws. See fig 7.
9. Do the same for the lower door.
Remember to also attach the door
handle using the door handle bolt.
See fig 8.
10. Attach the doors to the main body
of the cupboard using two small
screws for each hinge. See fig 9.
11. Insert the shelf brackets in the
holes in the side panels.
See fig 10.
12. Place the shelves on the shelf
brackets.
14. Insert the paper holder.
13. To finish the assembly of your tidy
cupboard, insert the screw covers
over the screw holes on the
outside of the tidy cupboard, top
and base. See fig 11.
1. This Tidy Cupboard should be assembled by an adult.
2. Keep all small parts out of the reach of children.
fig 7.
Assembly instructions
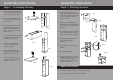
Stage 1 - Assembling the body
1. Attach the door bracket to the
underside of the fixed shelf using
the medium screws. See fig 1.
2. Insert the doweling rods into the
holes in the sides of the fixed
shelf. See fig 1.
3. Use the doweling rods to fit the
fixed shelf to the side panels.
The shelf should attach to the
upper set of holes. This may be a
tight fit. See fig 2.
4. Lay the cupboard on it s back and
use four of the large screws to
attach the base. See fig 3.
5. Slide the rear panel into the
channels at the rear of the
cupboard. See fig 4.
6. Attach a door bracket to the
underside of the top using two
medium screws. See fig 5.
7. Use the remaining four large
screws to secure the top of the
cupboard. See fig 6.
fig 1.
fig 2.
fig 3.
fig 4.
fig 5.
fig 6.
fig 8.
fig 9.
fig 10.
fig 11.