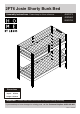
2FT6 Josie Shorty Bunk Bed Assembly Instructions - Please keep for future reference 404/9373 425/5662 805/9792 Dimensions Width - 180,0cm Depth - 88,0cm Height -154,6cm Important – Please read these instructions fully before starting assembly If you need help or have damaged or missing parts, call the Customer Helpline: 03456 400 800 Issue 1 - 20/02/18
Safety and Care Advice Important – Please read these instructions fully before starting assembly . Check you have all the components and tools listed on pages 2 and 3. . Remove all fittings from the plastic bags and separate them into their groups. . Keep children and animals away from the work area, small parts could choke if swallowed. . Make sure you have enough space to layout the parts before starting. . Assemble on a soft level surface to avoid damaging the unit or your floor. .
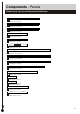
Components - Panels Please check you have all the panels listed below 1 Left front foot/ right back foot x 2 (152,5 x 6,3 x 2,5 cm) 2 Left back foot (152,5 x 6,3 x 2,5 cm) 3 Right front foot (152,5 x 6,3 x 2,5 cm) 4 Wide bar x 4 (68,2 x 11,0 x 1,9 cm) 5 Narrow bar x6 (68,2 x 6,5 x 1,9 cm) 6 Curved bar with label (68,2 x 9,0 x 1,9 cm) 7 Front side rail x2 (175,0 x 11,0 x 3,8 cm) 8 Back side rail x2 (175,0 x 11,0 x 3,8 cm) 9 Long guard rail x2 (175,0 x 6,5 x 1,9 cm) 10 Short guard rail x2 (
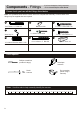
If you have damaged or missing components, call the Customer Helpline: 03456 400 800 Components - Fittings Please check you have all the fittings listed below Note: The quantities below are the correct amount to complete the assembly. In some cases more fittings may be supplied than are required.
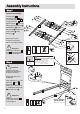
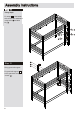
Assembly Instructions Step 1 Inserting wooden dowels: Insert wooden dowels G into the indicated parts. G G G G G 12 x 10 2 2x 2x 9 G G 8 2x G G 7 G 2x G G G G 6 G 5 G G 6x 04 4x G G 15 G G G Step 2 Footboard assembly: D+C D+C Fit wide bars 4 narrow bars 5 and curved bar 15 D+H to left front foot 1 and left back foot 2 . D+C 1 Then, fix narrow bars using D C + bolts C and allen key D . Insert barrel nuts B where D + H shown .and fix bolts H B using allen key D .
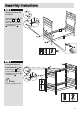
Assembly Instructions Step 3 Headboard assembly: Fit wide bars 4 and narrow bars 5 and curved bar with label 6 to right back foot 1 and right front foot 3 .Then, fix narrow bars using bolts C D+C and allen key D . Insert D+C barrel nuts B where shown D+H and fix bolts H using allen key D . D+C D+C D+H H 6 5 B 1 B 4 B 5 B C+D C+D H+D 3 5 C 4 Note correct holes position on the posts. C+D B C+D H+D Do not over tighten bolts.
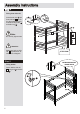
Assembly Instructions Step 5 Fixing side rails to the footboard: B Insert barrel nuts B into side rails 7 and 8 as shown. With help, fix side rail to to footboard using bolts A and allen key D . A 8 B B D+A 7 D+A A D Step 6 Fixing back side rail: Insert barrel nuts B into back side rail 8 and fix it to the headboard and footboard using bolts A and allen key D .
Assembly Instructions Step 7 Fixing front side rail: A Insert barrel nuts B into front side rail 7 and fix it to the headboard and footboard using bolts A and allen key D . B A+D B B 7 Note D+A Do not fully tight screws Attention: Make sure hole on side rail 8 is positioned as shown in the diagram. ATTENTION! Step 8 MATTRESS HEIGHT MUST NOT BE ABOVE THIS LINE Fixing ladder: Attach ladder side rail 11 using bolt F and allen key D .
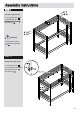
Assembly Instructions Step 9 F +D F +D Fixing long guard rail: Fix long guard rails 9 to the headboard and footboard using bolts F and allen key D . 9 9 D+F D+F Attention: Finish tighten screws on side rails using allen key D . Step 10 Fixing short guard rail: Fix short guard rail 10 to the footboard and ladder side rail using bolts F and allen key D .
Assembly Instructions Step 11 Fixing Steps: Fix steps 12 to the ladder side rail and the headboard using bolts F and allen key D . F +D 12 F +D D+F 12 D+F Step 12 E E 13 E Fixing guard rail support: Fix guard rail support 13 to the guard rails using screws E .
Assembly Instructions Step 13 1º I 14 Fixing slats: ! 14 60 - 72mm Please fix the first slats 14 at the ends of the rail and work towards the middle of the bed using the spacer I as shown to ensure correct spacing. 1º I I 14 I J 14 E 14 14 ! 60 - 72mm Fix one side first, using screws E ,the fix the other side by pushing the rail against the slats if necessary.