
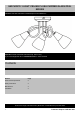
User's Instructions


4 Customer Helpline 0345 640 3030
Installation
Installation
IMPORTANT ! - Electrical connections must
be carried out by a suitably qualified person and
in accordance with all relevant local building and
installation regulations. If in doubt consult a
qualified electrician.
Installation
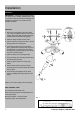
1. Remove the fixing bracket from the ceiling
can, using as template mark two holes on the
ceiling, using a drill, drill the holes previously
marked and insert suitable ceiling plugs.
2. Place the fixing bracket over the holes.
3. Use the two fixing screws provided to secure
fixing bracket to the ceiling joist.
4. Connect the supply wires to the terminal
block, opposite the corresponding wires from
the fitting (Dia.1). (Ensure that connections
are tight and no loose strands of wire are left
out of the connector block).
5. Place the fitting over the fixing bracket.
6. Screw the fitting onto the fixing bracket using
the side screws provided.
7. Place the glass shades over each lamp
holder.
8. Secure Glass shades in place screwing
shade rings onto the lamp holders with shade
tool provided.
9. Screw bulbs (not supplied) into the lamp
holders. (Wattage & bulb type stated on the
fitting).
Switch on the mains supply and test the fitting.
REPLACEMENT LAMP
We recommend LED lamps only.
(Ensure same lamp brand and specification for
each lamp holder)
Maximum wattage – See lamp holder
Light bulb shape - See lamp holder
Dia. 1
1
2
4
3
5
6
7
8
9