
Assembly Instructions
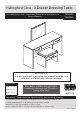
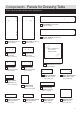
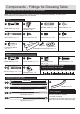
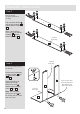
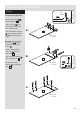
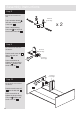
Table Of Contents
- ZHGDTS2 01
- ZHGDTS2 02
- ZHGDTS2 03
- ZHGDTS2 04
- ZHGDTS2 05
- ZHGDTS2 06
- ZHGDTS2 07
- ZHGDTS2 08
- ZHGDTS2 09
- ZHGDTS2 10
- ZHGDTS2 11
- ZHGDTS2 12
- ZHGDTS2 13
- ZHGDTS2 14
- ZHGDTS2 15
- ZHGDTS2 16
- ZHGDTS2 17
- ZHGDTS2 18
- ZHGDTS2 19
- ZHGDTS2 20
- ZHGDTS2 21
- ZHGDTS2 22
- ZHGDTS2 23
- ZHGDTS2 24
- ZHGDTS2 25
- ZHGDTS2 26
- ZHGDTS2 27
- ZHGDTS2 28
- ZHGDTS2 29
- ZHGDTS2 30
- ZHGDTS2 31
- ZHGDTS2 32

Assembly Instructions
8
Step 7
C
C
Finished
front edge
Finished
front edge
Finished
front edge
a: b:
d: e:
c:
Turn the divider over
O a
G
1st
screw
Finished
front edge
CL
Finished
front edge
Bradawl
O a
Prepare the left divider
a: Fit a CL runner
to the left divider .
The 1st screw uses
the 1st hole in from the
front of the runner.
The 2nd and 3rd screws
. use the holes that line
up with the other panel
holes.
b: Mark the top hole of
the runner with a
bradawl and then fit a
screw .
c: Insert 2 large locking
cam nuts into the left
divider .
Tap 2 wooden dowels
into the left divider .
Turn the divider over
d: Fit a CR runner
to the left divider .
The 1st screw uses
the 1st hole in from the
front of the runner.
The 2nd and 3rd screws
. use the holes that line
up with the other panel
holes.
e: Mark the top hole of
the runner with a
bradawl and then fit a
screw .
Screw a metal dowel
into the left divider .
O a
7
G
G
F
O a
G
G
F
O b
B
7
7
7
CL
G
G
G
O a
CL
F
CL
C
B
B
O b
G
1st
screw
Finished
front edge
CR
Finished
front edge
O b
Bradawl
CR
G
G
G
O b
CR
F
Finished
front edge
Finished
front edge
O b
7 7
7
7
7
A
A
7