
Assembly Instructions
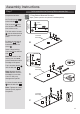
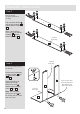
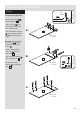
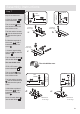
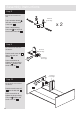
Table Of Contents
- ZHGDTS2 01
- ZHGDTS2 02
- ZHGDTS2 03
- ZHGDTS2 04
- ZHGDTS2 05
- ZHGDTS2 06
- ZHGDTS2 07
- ZHGDTS2 08
- ZHGDTS2 09
- ZHGDTS2 10
- ZHGDTS2 11
- ZHGDTS2 12
- ZHGDTS2 13
- ZHGDTS2 14
- ZHGDTS2 15
- ZHGDTS2 16
- ZHGDTS2 17
- ZHGDTS2 18
- ZHGDTS2 19
- ZHGDTS2 20
- ZHGDTS2 21
- ZHGDTS2 22
- ZHGDTS2 23
- ZHGDTS2 24
- ZHGDTS2 25
- ZHGDTS2 26
- ZHGDTS2 27
- ZHGDTS2 28
- ZHGDTS2 29
- ZHGDTS2 30
- ZHGDTS2 31
- ZHGDTS2 32

Assembly Instructions
4
Step 1
Finished
front edge
CL
C
C
Finished
front edge
Finished
front edge
O a
G
1st
screw
Finished
front edge
CL
Finished
front edge
Bradawl
O a
hps://www.youtube.com/watch?v=Z6lGMy19h7Q
Fixing Bottom Mounted Runners
a:
b:
c:
Prepare the left side
a: Fit a CL runner
to the left side .
The 1st screw uses
the 1st hole in from the
front of the runner.
The 2nd and 3rd screws
. use the holes that line
up with the other panel
holes.
b: Mark the top hole of
the runner with a
bradawl and then fit a
screw .
Insert 2 large locking
cam nuts into the left
side .
Note: The arrow on the
locking cam nut must
point towards the hole in
the edge of the panel.
Tap 2 wooden dowels
into the left side .
Note: Wooden dowels
must not stick out from
the edge by more than
10mm or they may
damage other panels.
c: Screw 5 metal dowels
. into the left side .
Note: Tighten the metal
dowels up fully against
the panels.
O a
3
G
G
F
O a
B
3
3
A
3
CL
G
G
G
O a
CL
F
CL
B
A
A
A
A
3
3
3
10mm
C
C
A
B
B
Let’s assemble the Dressing Table carcase first
A