
Assembly Instructions
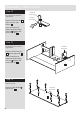
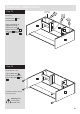
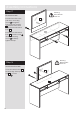
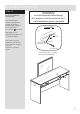
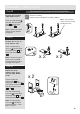
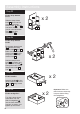
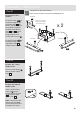
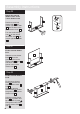
Table Of Contents
- ZHGDTS2 01
- ZHGDTS2 02
- ZHGDTS2 03
- ZHGDTS2 04
- ZHGDTS2 05
- ZHGDTS2 06
- ZHGDTS2 07
- ZHGDTS2 08
- ZHGDTS2 09
- ZHGDTS2 10
- ZHGDTS2 11
- ZHGDTS2 12
- ZHGDTS2 13
- ZHGDTS2 14
- ZHGDTS2 15
- ZHGDTS2 16
- ZHGDTS2 17
- ZHGDTS2 18
- ZHGDTS2 19
- ZHGDTS2 20
- ZHGDTS2 21
- ZHGDTS2 22
- ZHGDTS2 23
- ZHGDTS2 24
- ZHGDTS2 25
- ZHGDTS2 26
- ZHGDTS2 27
- ZHGDTS2 28
- ZHGDTS2 29
- ZHGDTS2 30
- ZHGDTS2 31
- ZHGDTS2 32

Assembly Instructions
12
Step 15
CL
CL
CL
4
3
7
8
Finished
front edge
Fit the top
Push the top onto
the assembly.
Use a screwdriver to
tighten the 8 large
locking cam nuts
fitted to the left side ,
right side , left divider
. and right divider .
1
3
4
7 8
B
1
CL
CL
CL
Step 16
Fit the 4 plastic nails
Tap 2 plastic nails
into the bottom edge of
each of the sides and
. .
Carefully stand the unit up
for the next step.
D
3
4
Warning: The
unit is heavy.
Lift with care.
D
D
D
D
3
4