Wow Raye Wooden Chair Assembly Instructions - Please keep for future reference 322/5837 345/6307 Dimensions Width - 41.
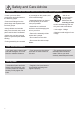
Safety and Care Advice Important - Please read these instructions fully before starting assembly • Check you have all the components and tools listed on the following pages. • Remove all fittings from the plastic bags and separate them into their groups. • Keep children and animals away from the work area, small parts could choke if swallowed. • Make sure you have enough space to layout the parts before starting. • During assembly do not stand or put weight on the product, this could cause damage.
Components - Parts If you have damaged or missing components, call the Customer Helpline: 0345 6400800 Please check you have all the parts listed below Note: The quantities below are the correct amount to complete the assembly of one chair. 3 Back rest top rail (27 x 5 x 2.5cm) 4 Back rest lower rail (27 x 5 x 2.5cm) 1 Left leg frame 2 Right leg frame 5 Seat 6 Seat back rail 7 Seat front rail 8 Stretcher (43 x 85 x 3cm) (27 x 5 x 1.8cm) (43 x 85 x 3cm) (34 x 5 x 1.8cm) (41.5 x 41 x 1.
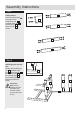
Assembly Instructions Step 1 Fitting dowels Insert wooden dowels B into holes on the backrest top rail 3 , backrest lower rail 4 , seat back rail 6 and seat front rail 7 as shown. B B B 3 B B B B 4 B B 3 B B B 6 B B B B 7 B B Step 2 Attaching back rest and rails Position the backrest top rail 3 , backrest lower rail 4 , seat back rail 6 and seat front rail 7 on the right leg frame 2 and insert the wooden dowels into holes as shown.
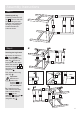
Assembly Instructions Step 3 Attaching left leg 1 Carefully position the left leg 1 as shown and with a help holding the rails and back rest, attach the left leg by inserting the wooden dowels into holes as shown. 4 6 3 7 2 Step 4 a: A A Securing the leg frames A 1 A a: Secure the leg frame using bolts A as shown and tighten using allen key D but do not fully tighten at this stage. 1 6 8 4 3 7 2 Attach the stretcher 8 between the legs 1 & 2 as shown and secure using bolts A .
Assembly Instructions Step 5 C Attaching seat Position the seat 5 face down on a flat and raised surface such as a table. 6 Position the chair frame on the seat as shown then fix seat back rail 6 and seat front rail 7 to seat using screws C . 5 Tighten screws using a crosshead screwdriver. Important: Make sure to correctly position the seat as shown in the diagram. C C 6 back of the seat C C 7 5 Carefully position the chair frame upright. Assembly is complete.
Dear Customer Please note that the product you have purchased is a natural living timber. Just like nature itself, wood varies in shape and colour. Knots, vein patterns, resin pockets and colour differences contribute to giving the piece of furniture its beauty and form - a natural part of solid wood. Although the tree has been cut down and dried, it is still alive and therefore will react to high and low temperatures, light, humidity, drought and time.