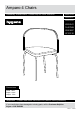
Amparo 4 Chairs Assembly Instructions - Please keep for future reference 600/1443 600/6527 600/6352 600/6541 144/7569 259/3807 621/5136 Dimensions Width - 58cm Depth - 49cm Height - 75cm Important – Please read these instructions fully before starting assembly If you need help or have damaged or missing parts, call the Customer Helpline: Argos = 0345 6400800 Issue 4 - 7/09/16
Safety and Care Advice Important – Please read these instructions fully before starting assembly • Check you have all the components and tools listed on the following pages. • During assembly do not stand or put weight on the product, this could cause damage. • Remove all fittings from the plastic bags and separate them into their groups. • Assemble the item as close to its final position (in the same room) as possible.
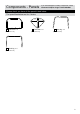
Components - Panels If you have damaged or missing components, call the Customer Helpline: Argos = 0345 6400800 Please check you have all the panels listed below The quantities below are for 4 chairs 1 Chair back x 4 (54.2 x 34.7 cm) 4 2 Chair seat x 4 (52.6 x 39.5 cm) 3 Chair leg x 4 (48.8 x 43.2 cm) Chair leg x 4 (57.7 x 42.
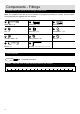
Components - Fittings Please check you have all the fittings listed below Note: The quantities below are the correct amount to complete the assembly of 4 chairs. In some cases more fittings may be supplied than are required.
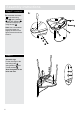
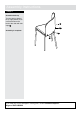
Assembly Instructions Step 1 C Assemble legs Assemble chair leg 3 and 4 using bolt C , curved washer G , spring washer H and nut D . 4 G Note: Do not fully tighten the bolts. H D 3 Step 2 Assemble seat and back Two people are needed here a: Place chair seat 2 upside down, put insert nuts E into the holes on the underside of the seat, make sure the threaded hole of the insert nut is aligned with the holes in the edge of the chair seat as shown in the figure. a: E E 2 E E Continued on next page.
Assembly Instructions Step 2 - continued b: Assemble chair back b: to the seat using bolts A , spring washers H and plain washers F , and secure tightly by using hex key K . 1 2 Note: Use a screwdriver to turn the insert nut slightly as shown in the figure if the bolt could not screw in. 1 F H A Step 3 Assemble legs Fix the chair legs to the seat using bolts B , spring washers H and curved washers G . B Note: Re-tighten all the bolts and nuts.
Assembly Instructions Step 4 Assemble bolt cap Turn the chair to back to its up- right position, then cover the bolts on the back of the chair with bolt caps I . I I Assembly is complete.