
Assembly Instructions
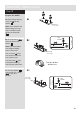
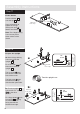
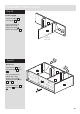
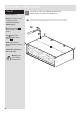
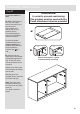
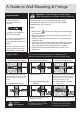
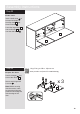
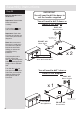
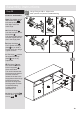
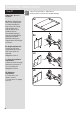
Table Of Contents

Assembly Instructions
14
Step 22
a:
Secure the unit to a
wall
a: Before fitting the unit
to a wall, use a spirit
level to check the top of
the unit is level,
front-to-back and
side-to-side in the 3
positions shown.
Use suitable packing
pieces (not supplied) to
make the unit level.
To prevent possible
overbalancing this unit
must be secured to a
suitable wall by fitting of
the 2 overbalance
protector kits to a
wall.
b: Push the unit up
against the wall and slide
the brackets against the
wall. Fit the 2nd screw
into the underside of the
top panel.
Mark the slot at the back
of the brackets for drilling
into the wall.
Wall fixings are not
supplied as they will need
to suit the wall type.
Note:
Take care when
drilling the wall that you
do not drill into any pipes,
wires etc.
If in doubt, consult an
expert.
WARNING!
In order to prevent overturning
this product must be used with the
2 wall attachment devices provided
K
b:
K
Back
Top
K
Top
See the next page for a guide
to wall mounting and fixings