
Assembly Instructions
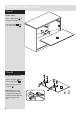


Secure unit to a wall
To prevent possible
overbalancing we
recommend that this unit
is secured to a suitable
wall by use of the metal
bracket fitted to the
underside of the top .
Fixings are not supplied
as they will need to suit
the wall type, and the
length of Screw will
depend on the distance
of the back of the Unit to
the wall.
Warning: Take
care when
drilling the wall that you
do not drill into any
pipes, wires etc. If in
doubt, consult an expert.
Assembly Instructions
12
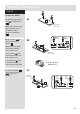
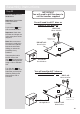
Step 19
L
3
Step 20
WALL
WALL
Top of unit
L
Warning: The
unit is heavy.
Lift with care.
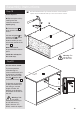
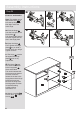
Fit back panel
a: Square up the unit by
making sure that
measurement x to x
equals y to y.
b: Place the back
down onto the unit, as
shown.
Use the nail guide to
hold the nails vertical
and at the correct
distance whilst you nail
around the outside of the
back .
Note: Nails should
be spaced about 150mm
apart.
Stand the unit up for
the next step.
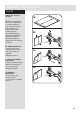
14
C
14
D
14
The measurement from top corner X to bottom corner X must be
equal to the measurement from top corner Y to bottom corner Y
a:
C
D
y
y
x
x
3
L