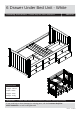
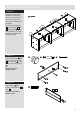
6 Drawer Under Bed Unit - White Assembly Instructions - Please keep for future reference 4838034 Dimensions Length - 187cm Depth - 49cm Height - 37cm Weight - 31kg Important – Please read these instructions fully before starting assembly If you need help or have damaged or missing parts, call the Customer Helpline: 0045 7668 8055 or e-mail: order@flexa.
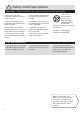
Safety and Care Advice Important – Please read these instructions fully before starting assembly • Check you have all the components and tools listed on pages 2 and 3. • Do not stand or put weight on the product, this could cause damage. • Remove all fittings from the plastic bags and separate them into their groups. • Assemble the item as close to its final position (in the same room) as possible. • Keep children and animals away from the work area, small parts could choke if swallowed.
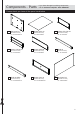
Components - Parts If you have damaged or missing components, call the Customer Helpline: 0045 7668 8055 Please check you have all the parts listed below 1 Side panel x4 4 Drawer side left x6 7 Plinth x6 White (36.3x48.5x1.5cm) No. 15-01503631-20 (43.0x14.6x1.3cm) No. 12-01304302 (60.2x6.5x1.5cm) No. 12-01506021-20 2 Drawer base x6 5 Drawer back x6 8 Drawer front x6 (58.0x42.5x0.3cm) No. 4309-030580 (56.8x14.6x1.3cm) No. 12-01305683 (59.8x17.3x1.5cm) No.
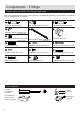
Components - Fittings Please check you have all the fittings listed below Note: The quantities below are the correct amount to complete the assembly. In some cases more fittings may be supplied than are required. No. 3933-15010 No. 4020-005 A B ø7x34mm Minifix bolt x32 ø15x9.5mm Minifix cam x48 No. 3924-04015 D No. 4020-006 C ø7/M4x34mm Minifix bolt x16 No. 4010-006 E No. 4001-022-20 F ø5x15mm Sleeve connector x20 No. 3912-04009 G ø9.
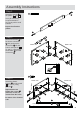
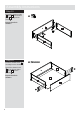
Assembly Instructions Step 1 Attach the dowels H to the plinths 6 and 7 . H H It may be necessary to tap the dowels in very gently with a small hammer. x12 7 6 Repeat for all twelve plinths. H Step 2 D Attach minifix bolts C to the sleeve connectors D and gently tap the connectors D into the holes in side panels 1 (2. and 3.). Unscrew the minifix bolts C from the connectors D . C D D 1 (2.) Front edge D C D 1 C D C D Middle side C C C C D C C C D (3.
Assembly Instructions Step 4 Attach minifix bolts C to the sleeve connectors D and gently tap the connectors D into the holes in side panels 1 (2. and 3.). D C D D Middle side Middle side C 1 (2.) D (3.) 1 Front edge C C D D C D D C Step 5 Be aware of the forward end! P Middle side 1 (2.) P P P Middle side P E (3.) 1 Front edge Important! Do not tighten the screws P until all 3 screws are inserted into the holes.
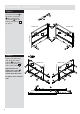
Assembly Instructions Step 6 C Please note! The minifix bolts C should only be tightened with your fingers, not tightened into the wood/panels using a screwdriver. Middle side Middle side C C (3.) 1 1 (2.) Front edge C C Step 7 C Front edge Attach minifix bolts C to the other side of side panels 1 (2. and 3.). C C C Please note! Make sure the 2 small holes in the panels are facing down against the floor. 1 (3.
Assembly Instructions A Please note! Make sure the 2 small holes in the panels are facing down against the floor. Right side A Front edge Attach the minifix bolts A to side panels 1 (1. and 4.) Left side Front edge Step 9 1 (1.) (4.) 1 A A A ! ! Step 10 A A 1 Assemble the left and right section by placing plinths 6 and 7 between the side panels 1 (1. and 2. and 3. and 4.) 6 1 7 6 (3.) 7 1 (2.
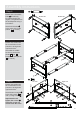
Assembly Instructions Step 12 Please note! The nails should be positioned at least 5 cm from the side panels. If not, the nail may hit the minifix cam in the plinth. m 5c K K m K m Attach the back panels 9 to the plinths 6 and 7 using nails K . Make sure that there is no gap between the plinths and the back panels. cm 5c cm 5c K 5 7 9 K 5 7 K m 5c 9 9 K 7 Step 13 F Insert minifix bolts A into holes in the drawer front 8 . Attach knob F to the drawer front using screw M.
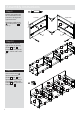
Assembly Instructions Step 15 Attach the drawers sides 3 and 4 to the drawer front 8 using minifix cams B . B Repeat for all six drawers. 8 4 B B 3 Step 16 Push the drawer base 2 carefully into the drawer. J Attach the drawer back 5 to the drawer sides 3 and 4 with the screws J . J 4 Repeat for all six drawers.
Assembly Instructions Step 17 Attach the drawer to the drawer runners E with the machine screws G inside to the drawer sides 3 and 4 . G Repeat for all six drawers. G 4 Step 18 Position the bed where it will be placed in the future, before attaching the 6 drawer underbed unit to the bed. Bed and 6 drawer unit can’t be moved together after the unit has been attached to the bed with the 2 brackets.
Assembly Instructions Step 19 The underbed unit should be flush with the bedside rail. Unit flush with the bedside rail. Step 20 Secure the unit in place with angles O and chipboard screws i . i O i Assembly is complete. If you need help or have damaged or missing parts, call the Customer Helpline: 0045 7668 8055 E-mail: order@flexa.dk 11 Ref.no.