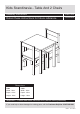
Kids Scandinavia - Table And 2 Chairs Assembly Instructions 498/1699 Retain these instructions for future reference 503/4459 Dimensions Table Chair Width - 50cm Width - 36cm Depth - 45cm Depth - 35cm Height - 52cm Height - 60cm Important – Please read these instructions fully before starting assembly If you need help or have damaged or missing parts, call the Customer Helpline: 03456 400 800 Issue 2 - 07/11/2016
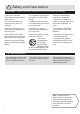
Safety and Care Advice Important – Please read these instructions fully before starting assembly • Check you have all the components and tools listed on pages 2 and 3. • Do not stand or put weight on the product, this could cause damage. • Do not use this item if any components are missing or damaged. • Assemble the item as close to its final position (in the same room) as possible. • This product is suitable for children in the age range which the product is designed, 3-6 years.
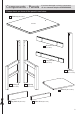
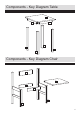
Components - Panels If you have damaged or missing components, call the Customer Helpline: 03456 400 800 Please check you have all the panels listed below Table top (50 x 45cm) 1 underside 8 Short rail x 2 (33 x 5cm) 9 Long rail x 2 (38 x 5cm) 2 Table leg (50.2 x 4.5cm) 3 Left leg x2 (60 x 34cm) 4 Right leg (60 x 34cm) 7 Seat x2 (36 x 34.
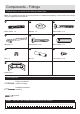
Components - Fittings Please check you have all the fittings listed below Note: The quantities below are the correct amount to complete the assembly. In some cases more fittings may be supplied than are required.
Components - Key Diagram Table 1 8 9 2 2 2 2 Components - Key Diagram Chair 5 7 6 6 4 3 4
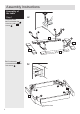
Assembly Instructions Assembly of the table Step 1 a: Assemble rails a: Fix all border fitts J to the long rails 9 with screws I . I J J I 9 J I I J 8 8 9 b: Fix short rails 8 to pre assembled long rails with screws I .
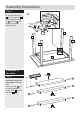
Assembly Instructions Step 2 Fix top to pre assembled rails E Put dowels F into table top 1 . E E assemble pre assembled rails to the pre-inserted dowel F on top 1 . E E Fix rails with screws E . F F 1 Step 3 Mounting the table legs onto the table top. a: Put the nut a: H in leg 2 and fix with screw A .
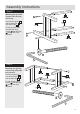
Assembly Instructions Step 4 b: Press the table legs 2 b: onto the table top 1 . Fix the table legs, using nut G , washers B and spanner through the holes indicated. B G 2 2 2 2 Assembly of the chair Step 1 Inserting the dowels to the top plinth and side rails. Insert the dowels F into the holes indicated on the top plinth 5 and the side rails 6 .
Assembly Instructions Step 2 Mounting the top plinth and the side rails onto the left leg. Press the top plinth 5 and the side rails 6 onto the left leg 3 . Fix the top plinth and the side rails using screws C and allen key D through the holes indicated. Step 4 Mounting the right leg onto the top plinth and the side rails. Press the right leg 4 onto the top plinth 5 and the side rails 6 . Fix the right leg using screws C and allen key D through the holes indicated.
Assembly Instructions Step 5 Adding the seat to the chair. Fix the side rails 6 onto the seat 7 using screws E through the holes indicated. Repeat with remaining chair Assembly is complete.
Dear Customer Please note that the product you have purchased is a natural living timber. Just like nature itself, wood varies in shape and colour. Knots, vein patterns, resin pockets and colour differences contribute to giving the piece of furniture its beauty and form - a natural part of solid wood. Although the tree has been cut down and dried, it is still alive and therefore will react to high and low temperatures, light, humidity, drought and time.