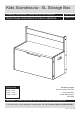
Kids Scandinavia - XL Storage Box Assembly Instructions - Please keep for future reference 487/6584 Retain these instructions for future reference 499/3144 Dimensions Width - 87cm Depth - 42cm Height - 63.
Safety and Care Advice Important – Please read these instructions fully before starting assembly • Check you have all the components and tools listed on pages 2 and 3. • Assemble on a soft level surface to avoid damaging the unit or your floor. • Do not use this item if any components are missing or damaged. • Parts of the assembly will be easier with 2 people. • Remove all fittings from the plastic bags and separate them into their groups.
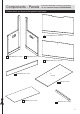
Components - Panels If you have damaged or missing components, call the Customer Helpline: 03456 400 800 Please check you have all the panels listed below 5 1 Left side (63.5 x 42cm) 2 Front panel (83.4 x 38.5cm) Right side (63.5 x 42cm) 6 Back panel (83.4 x 38.5cm) 3 Top plinth (83.4 x 8cm) underside 4 Top (83 x 42cm) 7 Bottom (84.6 x 40cm) 8 Rail x 4 (38 x 2.
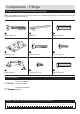
Components - Fittings Please check you have all the fittings listed below Note: The quantities below are the correct amount to complete the assembly. In some cases more fittings may be supplied than are required.
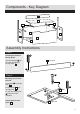
Components - Key Diagram 3 4 8 8 6 2 1 5 7 Assembly Instructions Step 1 C Inserting the dowel to the top plinth. 3 Top plinth Insert the dowels C into the holes indicated on the top plinth 3 . C C E Step 2 Mounting the rail onto the side. Put dowels I in the right side 2 . Press the Rail 8 onto the right side 2 . Fix the rail using screws E trough the holes indicated. Repeat with left side panel 1 .
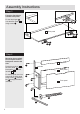
Assembly Instructions Step 3 Fixing the flap hinges onto the back panel. D Fix the flap hinges D onto the back panel 6 using screws H . H H H 6 Back panel D D H H H Step 4 Mounting the top plinth, the front panel and the back panel onto the left side. Press the top plinth 3 , the front panel 5 and the back panel 6 onto the left side 1 . Fix the top plinth, the front panel and the back panel using screws A and allen key B through the holes indicated.
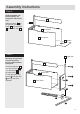
Assembly Instructions Step 5 Slide the bottom into the front panel, the back panel and the left side. Slide the bottom 7 into the grooves of the front panel 5 , the back panel 6 and the left side 1 . 3 1 Left side 6 Back panel 5 Front panel 7 Bottom Step 6 2 Right side Mounting the right side onto the top plinth, the front panel and the back panel. Press the right side 2 onto the top plinth 3 , the front panel 5 and the back panel 6 .
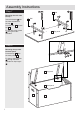
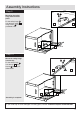
Assembly Instructions Step 7 E I 8 Rail Mounting the rails onto the top Insert the dowels I into the holes indicated on the top 4 . E 8 Rail E E I Pres the rails 8 onto the top 4 . E Fix the rails using screws E throug the holes indicated. I I 4 Top panel I Step 8 Mounting the top onto the back panel. D Press the top 4 , onto the back panel 6 . H H Fix the top using screws H through the holes indicated on flap hinges D.
Assembly Instructions Step 9 F Mounting the safety hinge onto the back panel. F G Fix the safety hinge G onto the back panel 6 using screws F into the pre-drilled holes. 6 6 4 4 Top panel Step 10 Mount the safety hinge onto the top. F Fix the safety hinge G onto the top 4 using screws F into the predrilled holes. F G 6 6 4 4 Top panel Assembly is complete.
Dear Customer Please note that the product you have purchased is a natural living timber. Just like nature itself, wood varies in shape and colour. Knots, vein patterns, resin pockets and colour differences contribute to giving the piece of furniture its beauty and form - a natural part of solid wood. Although the tree has been cut down and dried, it is still alive and therefore will react to high and low temperatures, light, humidity, drought and time.