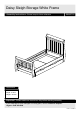
Daisy Sleigh Storage White Frame Assembly Instructions - Please keep for future reference 258/5712 Dimensions Width - 96cm Depth - 216cm Height - 99.
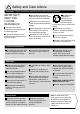
! Safety and Care Advice Important - Please read these instructions fully before starting assembly IMPORTANT! KEEP FOR FUTURE REFERENCE Check you have all the components and tools listed on the following pages. Remove all fittings from the plastic bags and separate them into their groups. Make sure you have enough space to layout the parts before starting. To reduce the likelihood of damaging your product please ensure that your power drill is set on a low torque setting.
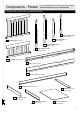
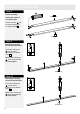
Components - Panels If you have damaged or missing components, call the Customer Helpline: Argos = 0345 640 0800 Please check you have all the panels listed below 6 Right footboard leg (68.5 x 12cm) 5 Left footboard leg 1 Headboard (92 x 74cm) (68.5 x 12cm) 4 Right headboard leg (99.5 x 14cm) 3 Left headboard leg (99.5 x 14cm) 2 Footboard (92 x 43cm) 7 Side x 2 (190 x 14cm) 8 Drawer front (188 x 15cm) 9 Drawer back (185 x 10cm) 12 Support bar x 2 (91.
Components - Fittings Please check you have all the fittings listed below Note: The quantities below are correct amount to complete the assembly. In some cases more fittings may be supplied than are required.
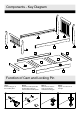
Components - Key Diagram 2 5 1 3 7 4 7 6 9 11 13 13 12 13 12 10 8 Function of Cam and Locking Pin Step 1: Fix the locking pin to the wooden panel. 1 Step 2: Push the wooden panel with the attached locking pin onto the other wooden panel. 2 L Step 4: Tighten: Turn the cam to the right. Step 3: Place the cam into the hole, arrow pointing towards the locking pin.
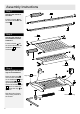
Assembly Instructions Step 1 7 Side D Inserting the dowels to the sides. D Insert the dowels D into the holes indicated on the sides 7 . D 7 Side D Step 2 Inserting the dowels to the headboard and the footboard. Insert the dowels D into the holes indicated on the headboard 1 and the footboard 2 . 1 Headboard D D D D D D D D D D D 2 Footboard D Step 3 Mounting the headboard legs to the headboard.
Assembly Instructions Step 4 Mounting the footboard legs to the footboard. H F Place the barrel nuts H onto the holes indicated on the footboard 2 and using screws F and screws G to fix the left footboard leg 5 and the right footboard leg 6 onto the footboard 2 , using allen key I to tighten it. Note the holes of barrel nuts pointing towards to the screws. 6 Right footboard leg 2 Footboard I F G H G 5 Left footboard leg I Step 5 Mounting the screws to the headboard legs and the footboard legs.
Assembly Instructions Step 6 Assembly the headboard legs and the footboard legs to the sides. Fit the headboard legs 3 , 4 and the footboard legs 5 , 6 into the holes indicated on the sides 7 . 1 Headboard 3 Left headboard leg 7 Side 2 Footboard Place the washers B onto the holes indicated on the sides 7 . Using nuts C and spanner J to fix the headboard and footboard to the sides 7 . Again please note the holes of nuts pointing towards to the screws.
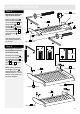
Assembly Instructions Step 7 Additional step to fix the slats. Watch out ! These screws must never collide. Note: The slats are supplied separately. Spreading the slats evenly onto the bed frame. Fix the slats to the slatholders using screws E. Watch out! The screws attach the slatholders to the sides never collide to the screws that fix the slats to the slatholders. 54.5mm 3.5mm 15mm Distances are approximate.
Assembly Instructions Step 8 M Drawer assembly. 12 Support bar Adding the dowels to the support bars. M M Insert the dowels M into the holes indicated on the support bars 12 . M M M 12 Support bar M M Step 9 L L Mounting the locking pins to the drawer front. Screw the locking pins L into the holes indicated on the drawer front 8 . Note: Insert locking pins L as far as shown. Do not over tighten. L L L L 8 Drawer front Step 10 Mounting the locking pins to the drawer back.
Assembly Instructions Step 11 K Adding the support bars to the drawer back. K Fit the support bars 12 onto the drawer back 9 . See page 4 "Function of cam and locking pin". Place the cams K into the holes indicated, arrows pointing towards the drawer back / locking pin. To tighten cams: Turn to the right using a screwdriver.
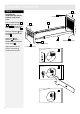
Assembly Instructions Step 14 Adding the drawer front to the drawer frame. 8 Drawer front K Press the drawer front 8 onto the drawer sides 10 and 11 . Place the cams K into the holes indicated, arrows pointing towards the drawer front / locking pins. To tighten cams: Turn to the right using a screwdriver. K K 10 Left drawer side 11 Right drawer side "Function of cam and locking pin" see page 4.
Dear Customer. Please note that the product you have purchased is a natural living timber. Just like nature itself, wood varies in shape and colour. Knots, vein patterns, resin pockets and colour differences contribute to giving the piece of furniture its beauty and form - a natural part of solid wood. Although the tree has been cut down and dried, it is still alive and therefore will react to high and low temperatures, light, humidity, drought and time.