
Assembly Instructions


Assembly Instructions
13
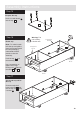
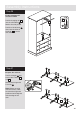
Step 24
Fit the plinths
Position the 3 plinths
around the outside of the
assembly, ensuring that
the bottom edge of the
plinths are flush with the
bottom edge of the
sides, as shown.
Secure the 2 side
plinths through the
left end and right
end using screws .
Carefully stand the
unit up for the next
step.
13
13
6
7
G
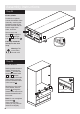
Warning: The
unit is heavy.
Lift with care.
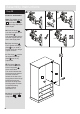
Step 25
Fit the drawers
Starting with the bottom
drawer, slide both the
runners forward and
locate the drawer sides
. and between
them, lining up the holes
in the drawer wrap with
the 2nd 'threaded' holes
in the runners .
Working from the inside
of the drawer, insert 2
screws through the
drawer sides and out into
the 2nd threaded hole in
the runner.
Note: Do not overtighten
the screws .
If they catch on the
runner you may need to
loosen them slightly.
I
M
M
I
2nd threaded
hole
M
I
2 3
G
G
6
7
G
G
13
13
I
I
2
3