
Assembly Instructions

Or any suitable low energy bulb.
example:
5watt = 25watts
7watt = 35watts
9watt = 45watts
11 watt = 60watts
15 watt = 75watts
20watt = 100watts
23watt = 125watts
N
N
LOOP
L
L
ASSEMBLY INSTRUCTIONS
432-4005 / 432-4012
WARNING
If in doubt, or difficulty is experienced contact a qualified electrician. Wire in accordance to current UK building regulations.
IMPORTANT!
Make sure that the power is switched off at the fuse box / consumer unit (electricity mains switch) before starting work.
BEFORE STARTING
Please read through these instructions and keep them for future reference. Carefully unpack the contents of the box.
FIXING INSTRUCTIONS
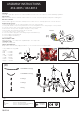
1. Place the fixing bracket onto the ceiling and mark holes in the required position .
2. Using a drill, drill the holes previously marked and secure the fixing bracket to the ceiling using the screws provided.
3. Screw the central column onto the HUB using the grub screws provided (A).
4. Fan the arms out into position and tighten using the screws provided.
5. Place a glass cup followed by a candle drip on each arm.
6. Screw the chain onto the central column.
7. Connect the mains supply wires to the fitting using the terminal block (C).
8. Hook the fitting to the fixing bracket.
9. Dress the fitting as illustrated (D).
10. Insert the bulbs.
RE
PLACEMENT LAMP
Maximum wattage - See Lamp holder. Lightbulb shape - See Lamp holder.
CLEANING CARE
Clean with a soft dry cloth
SAFETY INFORMATION
Always switch off the electricity supply and allow to cool for10 minutes before changing the lamp.
QA01529
APPROVED
3/04/2008
Fitting wire colour Household circuit
Blue connect to Blue or Black (Neutral)
Green/Yellow connect to Green/Yellow -sleeved Copper (Earth tag)
Brown connect to Red or Brown (Switched Live)
Fig1
(A)
SPACE THE ARMS OUT EQUALLY
AND TIGHTEN THE FIXING SCREWS
14 x D14mm 5 x Strings
12 x D14mm 5 x Strings
20 Strings
10 Strings
1 String
FIXING BRACKET
(B)
(C)
(D)