
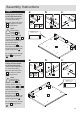
Assembly Instructions
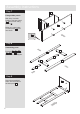

b: Fix front plinth
to the front frames and
using screws .
Note:
Make sure front
plinth is aligned to the
bottom edge of the side
panels and in line to the
side plinths.
C
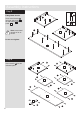
Assembly Instructions
9
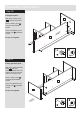
Step 12
Fixing top panel.
Important:
With help, carefully
stand the product upright.
With help, f
it top panel
to the cabinet.
Insert locking nuts8
side p sinto anel and
middle panels where
shown.
Use a screwdriver to turn
locking nuts clockwise
to lock.
Do not over tighten.
Fix metal brackets in
the middle panels and
middle frames using
screws as shown.
1
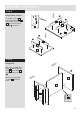
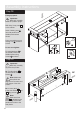
Step 13
Important:
With help, carefully
lay down the product.
Fix side plinths toa:
the side panels using
screws .
Make sureNote:
side plinths are
aligned to the bottom and
front edges of the side
panels.
C
O
B
I
I
1
I
I
I
I
I
I
I
BB
O
O
a:
a:
14
b:
4
19
18
14
C
C
C
C
C
C
14
4
18
19
4