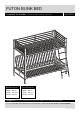
FUTON BUNK BED Assembly Instructions - Please keep for future reference Open Dimensions Close Dimensions Width - 201cm Width - 201cm Depth - 177.
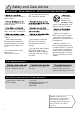
Safety and Care Advice IMPORTANT – READ CAREFULLY – RETAIN FOR FUTURE REFERENCE components and tools listed on pages 2 and 3. plastic bags and separate them into their groups. away from the work area, small parts could choke if swallowed. Do not stand on the product, this could cause damage. room) as possible. surface to avoid damaging the space to layout the parts before starting. easier with 2 people.
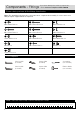
Components - Panels Please check you have all the panels listed below 1 Metal leg x 4 ( Ø4.8 x 165cm) 2 Headboard x 2 3 Lower footboard x 1 (89.9 x 39.3cm) (88.7 x 20cm) AR GO S 4 Lower footboard x 1 (88.7 x 20cm) 7 Bottom cross bar x 2 (190.7 x 4cm) 10 Back safety barrier x 1 (190.4 x 37cm) 13 Spring hinge X 1 (46 x 16cm) 5 Filler bar x 2 (90.1 x 3cm) 8 Top cross bar x 1 (190.7 x 4cm) 11 Front safety barrier x 1 (154 x 37cm) 6 Top cross bar x 1 (190.7 x 4cm) 9 Bed slats x 1 (190 x 93.
Components - Fittings If you have damaged or missing components, call the Customer Helpline: 08456 400800 Please check you have all the fittings listed below Note: The quantities below are the correct amount to complete the assembly. In some cases more fittings may be supplied than are required.
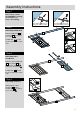
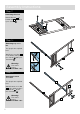
Assembly Instructions Step 1 Note: Please ensure the WASHER is curving in facing the hole before assembling. The washer curving in facing the hole is correct. The washer curving out facing the hole is incorrect. Step 2 Attaching headboard 1 1 Attach headboard Ⓑ 2 to metal leg Ⓐ 1 by using 2 pcs of bolts A . 2 A Headboard 2 should be faced toward to other side.
Assembly Instructions Step 5 Attaching metal leg Attach metal leg 1 to the lower footboard 3 by using 2 pcs of screws B and 2 pcs washers C. 3 C 2 1 C B B Step 6 Attaching Filler bar D Attach filler bar 5 to headboard 2 by using 3 pcs of bolts D . D D 5 2 Step 7 Attaching headboard Attach headboard 2 to metal leg 1 by using 2 pcs of bolts A .
Assembly Instructions Step 8 B Attaching lower footboard B C C Attach lower footboard 4 to metal leg 1 by using 2 pcs of bolts B and 2 pcs of washers C . 1 4 Footboard 4 should be faced toward to other side. Step 9 A 2 Attaching metal leg Attaching the other metal leg 1 to the headboard 2 by using 2 pcs of bolts A . 1 4 2 A 1 A Step 10 Attaching lower footboard Attach lower footboard 4 to metal leg 1 by using 2 pcs of bolts B and 2 pcs of washers C .
Assembly Instructions Step 11 Attaching filler bar D Attach filler bar 5 to headboard 2 by using 3 pcs of bolts D . D D 4 5 2 Step 12 Attaching top cross bar 4 Two people are required here. Attach top cross bar 6 to the unit by using 2 pcs of bolts B and 2 pcs of washers C . 6 1 C Warning: The unit is heavy. Lift with care. C B B Step 13 Attaching bottom cross bar Two people are required here. Attach bottom cross bar 7 to the unit by using 2 pcs of bolts B and 2 pcs of washers C .
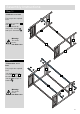
Assembly Instructions Step 14 Join both cross bars Two people are required here. Join both cross bars 6 and 7 to the completed units by using 4 pcs of bolts B and 4 pcs of washers C . 3 B C 1 B 7 C Warning: The unit is heavy. Lift with care. 4 6 1 Step 15 B C Join another cross bars Two people are required here. B C 1 3 Join another 2 pcs of cross bar 7 and 8 to the unit by using 4 pcs of bolts B and 4 pcs of washers C . 7 C 8 Warning: The unit is heavy. Lift with care.
Assembly Instructions Step 16 Attaching bed slats Spread out the bed slats 9 ,make sure each hook of slat point downwards as shown. 9 Step 17 Attaching bed slats Two people are required here. Use a rubber mallet(not supplied) gently tap each slat lock onto cross bars 8 and 6 . Recommend 2 persons for assembly.
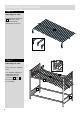
Assembly Instructions Step 18 E F Attaching safety barrier 10 Two people are required here. F 8 E Attach safety barrier 10 to this unit through 2 pcs of bolts E and 2 pcs of washers F . Fix 3 pcs of bolts D and washers G to this safety barrier 10 through top cross bar 8 . 1 1 10 8 G D Step 19 Fixing safety barrier Fix safety barrier 10 to the unit throush 3 pcs of bolts D with tool.
Assembly Instructions Step 20 Attaching ladders Ladder can be fixed to either left or right side.
Assembly Instructions Step 21 Attaching front safety barrier Two people are required here. E F 11 Attach front safety barrier 11 to top bunk by using one of bolt E and washer F from side and 1 pcs of bolt E and washer G from bottom with tool as shown. 6 G E G E Step 22 Attaching front safety barrier Secure safety barrier Ⓚ 11 underside by using 2 pcs of bolts D and 2 pcs of washers G with tool as shown.
Assembly Instructions Step 23 Attaching spring hinge Attach 1 pc of spring hinge 12 by using 2 pcs of bolts H and washer G with tool. 3 4 3 12 G H Step 24 Attaching spring hinge Attach 1 pc of spring hinge 13 by using 2 pcs of bolts H and washer G with tool.
Assembly Instructions Step 25 Attaching futon frame Lay down futon frame 14 on spring hinge 13 by using 2 pcs of bolts I , washers F , G and nuts J with spanner and tool. I 14 F G 13 J Step 26 Attaching futon frame Fix another side of the futon frame 14 through spring hinge 12 by using 2 pcs of bolts I , washers F , G and nuts J with spanner and tool.
Assembly Instructions Step 27 Attaching futon frame Lay down futon frame 15 on spring hinge 12 by using 2 pcs of bolts I , washers F , G and nuts J with spanner and tool. I F G 15 J Step 28 Attaching futon frame Fix another side of the futon frame 15 through spring hinge 12 by using 2 pcs of bolts I , washers F , G and nuts J with spanner and tool.
Assembly Instructions Step 29 Fixing ladder ( for right side ) a: a: Attach the ladder onto this unit as shown. 6 16 b: Fix the ladder to the unit by using 2 pcs of bolts K and nuts L with tool. 16 b: L L K K Step 30 M Attaching plastic covers M 1 7 Attach 14 pcs of plastic covers M as shown.
Assembly Instructions Step 31 Putting futon frame in positon a: a: Lift up the front futon frame. 15 b: Push it inward. b: 15 c: Put down the futon frame front to lock in position.
Assembly Instructions Step 32 Assembly is complete. WARNING: TOP OF THE MATTRESS SHALL NOT COME ABOVE THE LABEL MARKED ON THE BED. MAX:200mm For safety reason,please ensure the top of the mattress shall not come above the line marked on the top bunk. Step 33 Assembly is complete.