
Installation instructions

V 04/10
4
INSTALLATION INSTRUCTIONS
This fan heater is designed for wall-installation; it must be mounted 1.8 m above the floor and at least
25 cm from the wall on each side. Do not install on the floor.
The fan heater must be installed on the wall before use. The installation sequence is listed below:
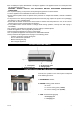
1. Select a space for installing the appliance (see Figure 1).
2. Drill two holes that are suitably sized for inserting the Fischer rawlplugs (see Figure 2) – D=460 mm.
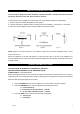
3. Insert the Fischer rawlplugs into the holes and tighten the screws provided.
NOTE: tighten the screws securely. Do not insert the screws into the Fischer rawlplugs entirely - leave
around 3-5 mm free.
Mount the appliance on the wall (see Figure 3): ensure that the holes on the rear of the appliance are
directed towards the two screws, push the fan heater backwards onto the wall then downwards until it lies in
a stable position.
OPERATION INSTRUCTIONS
THIS APPLIANCE IS INTENDED FOR HOUSEHOLD USE ONLY.
HEATING POWER: MINIMUM 1,000 W - MAXIMUM 2,000 W
POWER SUPPLY: . 220-240VAC/50Hz
Before turning the fan heater on, check that all the buttons of the product’s control panel are on 0. Insert the
plug directly into an AC socket with mains voltage corresponding to that indicated on the product’s data plate.
Make sure that the plug fits tightly into the socket.
1. Press the POWER button to turn the appliance on: check whether it functions properly.
2. Press the HEATER button to select the appliance’s operating power level:
0 – cold air discharge
I – air discharge at minimum power - 1,000 W
II – air discharge at maximum power - 2,000 W
3. Press the VANE button to activate the horizontal swinging flap.
0 – swinging off
1 – swinging on
Figure 1 Figure 2
Figure 3