EG OPERATING INSTRUCTIONS ● ISTRUZIONI D'USO NOTICE D’UTILISATION ● BEDIENUNGSANLEITUNG INSTRUCCIONES DE USO ● INSTRUCÇÕES DE FUNCIONAMENTO I F D E P MOVABLE AIR CONDITIONER ● CLIMATIZZATORE PORTATILE CLIMATISEUR MOBILE ● MOBILES KLIMAGERÄT ACONDICIONADOR PORTATIL ● AR CONDICIONADO PORTÁTIL Save these instructions / Conservate queste istruzioni / Conserver cette notice d’utilisation Bewahren Sie bitte diese Bedienungsanleitungen auf / Guardeis estas instrucciones / Guarde estas instruções 37.4252.008.
CONTENTS EG PRODUCT IDENTIFICATION...................................................................................... 2 SIGNALING LAMPS .................................................................................................. 3 BEFORE USING THE APPLIANCE............................................................................. 3 OPERATION ............................................................................................................... 4 USING THE REMOTE CONTROL UNIT...
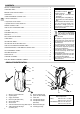
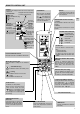
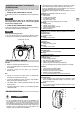
SIGNALING LAMPS 1 6 2 3 4 5 EG 1. Receiver : receives signals transmitted from the remote control. 2. TIMER lamp: This lamp lights up when the system is being controlled by the timer or sleep mode. 3. OPERATION lamp: This lamp lights up during operation. It blinks once to announce that the remote control signal has been received and stored. It blinks continuously during the protection modes (defrosting, etc.). 4.
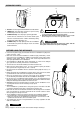
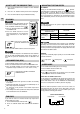
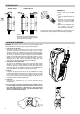
OPERATION COOLING ● Place the air conditioner as near as possible to the window. Fit the flexible tube by hooking it to the rear of the unit. Extend the flexible tube just enough to reach the outdoor, passing under the window shutters set ajar. ● In case there is a window sill towards the inside of the room, it might be better to use the supplied outlet nozzle. Insert the nozzle into the free end of the flexible tube. ● Open the window and lock one of the shutters.
REMOTE CONTROL UNIT DISPLAY Information are displayed when the remote control unit is switched on. Displayed when data trasmitted Operation Mode Or remote control unit lock Cooling Dehumidification (dry) Fan only Shows the type of timer TRANSMITTER When you press the buttons of the remote control unit, the mark appears on the display to transmit the setting changes to the receiver in the air conditioner.
ADJUSTING THE FAN SPEED HOW TO SET THE PRESENT TIME 1. Press the SET button for five seconds. The time indication alone flashes. 2. Press the + or - buttons until the present time is displayed. 3. Press the SET button to stop the indication flashing. EG COOLING AUTOMATIC Simply set the FAN SPEED selector to the position. A microcomputer automatically controls the fan speed when the AUTO mode is selected.
SETTING THE TIMER There are four timers that can be selected on the remote control.Two daily timers (designated as T1,T2) ,and two optional weekend timers (designated as WKT1, WKT2) .Each timer can be selected by pressing TIMER button. The daily timers T1 and T2 can be set for ON and OFF separately for two different time periods. Timer setting will not change until new setting is input.
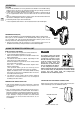
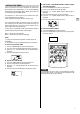
SETTING AIR FLOW DIRECTION To set the air flow direction, seize the deflector blades and pull towards you. Vertical Flow Horizontal Flow EG HOW TO DISCHARGE THE WATER TANKS The air conditioner removes humidity of the air, collecting the condensate into the internal tank. The condensate water can be evacuated through the external discharge tube located on the rear of the unit.
OPERATION WITHOUT THE REMOTE CONTROL UNIT If you have lost the remote control unit or it has troubles, follow the steps below. 1. WHEN THE AIR CONDITIONER IS STOPPED If you want to turn on the air conditioner push the operation button. NOTE The air conditioner will start in automatic fan speed The temperature setting is 22°C for cooling mode and 28°C for heating mode. 2.
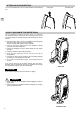
PORTHOLE KIT SINGLE GLASS DOUBLE GLASS ASSEMBLING NOTE HOLE HOLE EG HOLE ● Make a hole in the window pane. ● Insert the porthole without the plug. ● Remove the terminal pipe fitting of the warm air outlet from the retractile flexible pipe. ● Bring the air conditioner near the window and insert the air outlet in the porthole. NOTE If you want to utilise the air conditioner in several rooms, it is possible to buy varies portholes for air discharge separately.
INDICE IL PRODOTTO ............................................................................................................. 2 SEGNALAZIONI .......................................................................................................... 3 PRIMA DI USARE IL CLIMATIZZATORE .................................................................... 3 MODALITÀ D’USO ...................................................................................................... 4 USO DEL TELECOMANDO........
SEGNALAZIONI 1 6 2 3 4 5 GIG 1. Ricevitore: riceve i segnali inviati dal telecomando. 2. Spia TIMER: si accende quando l’unità è controllata dal timer o dal programma notturno. 3. Spia funzionamento (OPERATION): si accende quando l’unità è in funzione. Lampeggia una volta per avvisare che il segnale del telecomando é stato ricevuto e memorizzato. Lampeggia continuamente durante le funzioni di protezione (sbrinamento, ecc.). 4.
MODALITÁ D'USO RAFFREDDAMENTO ● Avvicinate il più possibile il climatizzatore alla finestra. Inserite il tubo flessibile agganciandolo, alla parte posteriore del climatizzatore. Estendete il flessibile quanto basta per raggiungere l’esterno passando sotto i battenti accostati della finestra. Accostate la finestra in posizione di minima apertura. ● Se la finestra ha un davanzale verso l’interno può rendersi necessario l’uso dell’apposito raccordo terminale fornito in dotazione.
TELECOMANDO VISORE Visualizza le informazioni quando il telecomando è acceso. Conferma trasmissione dati Modo di funzionamento al climatizzatore o bloccaggio Raffreddamento telecomando Deumidificazione Ventilazione TRASMETTITORE Quando vengono premuti i pulsanti del telecomando, il simbolo si accede sul visore per trasmettere i cambiamenti della regolazione al ricevitore del climatizzatore.
SCELTA VELOCITÀ VENTILATORE COME REGOLARE L'OROLOGIO 1. Premere il pulsante SET per cinque secondi. Lampeggia solo l’indicazione dell’ora. 2. Premere i pulsanti + o - finché viene visualizzata l’ora attuale. 3. Premere il pulsante SET e l’indicazione smette di lampeggiare. RAFFREDDAMENTO AUTOMATICO Impostare con il pulsante FAN SPEED. Il microprocessore controllerà automaticamente la velocità del ventilatore.
REGOLAZIONE DEL TIMER Il climatizzatore è dotato di quattro timer che possono essere selezionati col telecomando. Due timer giornalieri (designati come T1,T2) e due timer opzionali per il fine settimana (designati come WKT1, WKT2). Ogni timer può essere selezionato premendo il pulsante TIMER. I timer T1 e T2 possono essere impostati su ON e OFF separatamente, per due differenti periodi di tempo. Le impostazioni del timer rimarranno invariate finché non saranno inserite nuove impostazioni.
REGOLAZIONE DEL FLUSSO D'ARIA Potete regolare la direzione del flusso dell’aria agendo sul deflettore posto sulla bocca di mandata aria; afferrate l’aletta del deflettore e tirate verso di voi per orientare il flusso dell’aria. Mandata verticale Mandata orizzontale I COME SVUOTARE I SERBATOI CONDENSA L’umidità asportata viene raccolta nel serbatoio interno e può essere scaricata tramite il tubo esterno sul retro dell’unità.
FUNZIONAMENTO SENZA TELECOMANDO Se il telecomando non funziona o è stato smarrito, operare come segue: 1. CLIMATIZZATORE FERMO Se volete avviare il climatizzatore premere il tasto funzionamento. NOTA Il condizionatore si avvierà con la velocità automatica del ventilatore. L’impostazione della temperatura é di 22°C per la modalità raffreddamento e di 28°C per il riscaldamento. GIG 2. CLIMATIZZATORE IN FUNZIONE.
KIT OBLÓ VETRO SINGOLO DOPPIO VETRO MONTAGGIO ● Praticare un foro sul vetro della finestra. ● Inserire l'oblò privo di tappo chiusura. ● Togliere il raccordo terminale scarico aria calda dal tubo flessibile retrattile. ● Avvicinare il climatizzatore alla finestra e inserire il tubo scarico aria nell'oblò. FORO NOTA FORO FORO NOTA Se si desidera usufruire del climatizzatore in vari locali è possibile acquistare più KIT OBLÓ scarico aria separatamente.
TABLE DE MATIERES GFG LE PRODUIT................................................................................................................ 2 DECLARATION DE CONFORMITE VOYANTS... ................................................................................................................. 3 AVANT D’UTILISER LE CLIMATISEUR ...................................................................... 3 MODE D’EMPLOI ....................................................................................
VOYANTS 1 6 2 3 4 5 F 1. Récepteur : reçoit les signaux de la télécommande. 2. Voyant du temporisateur (TIMER): Ce voyant s'allume lorsque l'unité est contrôlée par le temporisateur ou par le programme nocturne. 3. Voyant de fonctionnement (OPERATION): Il s’allume quand le climatiseur est en marche. Il clignote une fois pour indiquer que le signal de la télécommande a été reçu et mémorisé. Il clignote continuellement pendant les modes de protection (dégivrage, ecc.). 4.
MODE D’EMPLOI REFROIDISSEMENT ● Approchez au maximum le climatiseur de la fenêtre. Introduire le tube flexible en l’accrochant à l’arrière de l’unité. Tirez le tube flexible afin d’atteindre l’extérieur en passant sous les battants entrouverts de la fenêtre. ● Si la fenêtre a un rebord intérieur, il peut s’avérer nécessaire d’utiliser le raccord terminal prévu à cet effet (fourni avec l’unité). Introduisez le raccord dans l’extrémité libre du flexible.
TELECOMMANDE AFFICHAGE Les informations sur le mode de fonctionnement s’affichent lorsque la télécommande est en fonction. Mode de fonctionnement Confirme la transmission des Refroidissement données au climatiseur et bloc Deshumidification de la telecommande Ventilation Indique les types des temporisateurs EMETTEUR Lorsque l'on appuie sur les boutons de la télécommande, le voyant clignote pour transmettre la modification des réglages au récepteur du climatiseur.
REGLAGE DE LA VITESSE DU VENTILATEUR REGLAGE DE L'HEURE 1. 2. 3. Appuyer sur le bouton SET pendant cinq seconds. L’indication de l’heure seule clignote. Appuyer sur les boutons + ou - jusqu’a ce que l’heure courante s’affiche. Appuyer sur le bouton SET jusqu’a ce que l’indication ne clignote pas. REFROIDISSEMENT AUTOMATIQUE Mettre le sélecteur FAN SPEED (vitesse du ventilateur) en position . Le microprocesseur du climatiseur règle automatiquement la vitesse du ventilateur.
REGLAGE DU TEMPORISATEUR Quatre temporisateurs peuvent être choisies sur la télécommande. Deux temporisateurs journaliers (appelées T1, T2) et deux temporisateurs de week-end en option (appelées WKT1, WKT2). Chacun de ceux temporisateurs peut être sélectionnée en appuyant sur la touche TIMER. Les temporisateurs journaliers T1 et T2 permettent de programmer la mise en marche et l'arrêt séparément sur deux périodes différentes. Une fois réglée, le temporisateur agira quotidiennement.
REGLAGE DU FLUX D’AIR Vous pouvez régler la direction du flux d’air grâce au déflecteur situé sur la bouche de sortie d’air. Saisir l’ailette du déflecteur et tirez-la vers vous afin d’orienter le flux d’air. Flux vertical Flux Horizontal GFG COMMENT VIDER LES RESERVOIRS DE CONDENSAT L’humidité absorbée est recueillie dans le réservoir intérieur et peut être vidée par le tube de vidange extérieur à l’arrière de l’unité.
FONCTIONNEMENT SANS LA TELECOMMANDE Si la télécommande a été perdue ou si elle ne fonctionne pas, procéder comme suit: 1. CLIMATISEUR ARRETE Pour mettre le climatiseur en marche, appuyer le bouton de fonctionnement. REMARQUE Le climatiseur se mettra en marche avec la vitesse automatique du ventilateur. Le réglage de la température est de 22°C pour le mode refroidissement y 28°C pour le chauffage. 2.
KIT HUBLOT VITRAGE SIMPLE VITRAGE DOUBLE MONTAGE ● Pratiquez un trou dans le carreau de la fenêtre. ● Enchâssez le hublot sans le bouchon. ● Enlevez le raccord final de la sortie d’air chaud du tuyau flexible rétractable. ● Approchez le climatiseur de la fenêtre et enchâssez le tuyau de sortie d’air dans le hublot. REMARQUE TROU GFG TROU TROU REMARQUE Si on désire utiliser le climatiseur dans plusieurs locaux, Il est possible d’acheter séparément plusieurs hublots pour l’expulsion de l’air.
INHALTSVERZEICHNIS DAS PRODUKT ........................................................................................................... 2 ANZEIGEN .................................................................................................................. 3 VOR INBETRIEBNAHME ............................................................................................ 3 ANWENDUNGSHINWEISE ........................................................................................
ANZEIGEN 1 6 2 3 4 5 GDG 1. Empfänger: Empfängt die von der Fernbedienung gesendeten lnfrarot-Signale. 2. Leuchtanzeige Timer: Sie leuchtet auf, wenn die Einheit vom Timer oder vom Nachtprogramm kontrolliert wird. 3. Betriebsleuchte (OPERATION): Leuchtet bei lnbetriebnahme der Einheit auf. Sie blinkt einmal, um zu warnen, daß das Signal der Fernbedienung empfangen und gespeichert werden ist. Sie blinkt immerzu während der Schutzfunktionen (Abtauung, etc.). 4.
ANWENDUNGSHINWEISE KÜHLUNG ● Das Klimagerät so nah wie möglich an das Fenster stellen. Den Abluftschlauch stecken, indem er an der Rückseite des Gerätes angreift. Den Schlauch ausziehen, so weit es notwendig ist, und durch eine Fensteröffnung (zwischen den Flügeln) stecken; das Fenster anlehnen. ● Falls das Fenster ein Fensterbrett nach innen hat, benutzen Sie die mitgelieferte Flachdüse. Die Flachdüse auf das Ende des Schlauches stecken.
FERNBEDIENUNG ANZEIGE Zeigt Informationen an, wenn die Fernbedienung in Betrieb ist. Betriebsweise Datenverkehrsbestatigung Kuhlung oder Fernbedienung Sperre Entfeuchtung Ventilation SENDER Wenn die FernbedienungsTasten gedrückt werden, leuchtet die Lampe auf dem Display auf, um die Einstellungsänderungen des Klimagerätes überzutragen. SENSOR Ein Temperatursensor im Innern der Fernbedienung mißt die Raumtemperatur.
WAHL DER VENTILATOR-GESCHWINDIGKEIT EINSTELLUNG DER UHR 1. 2. 3. Die Taste SET während fünf Sekunden drücken. Die Stundenanzeige nur blinkt. Die Taste + oder - solange drücken, bis die aktuelle Stunde angezeigt wird. Die Taste SET drücken und die Anzeige blinkt nicht mehr. KÜHLUNG AUTOMATIK Mit der Taste FAN SPEED die Position “AUTO” eingeben. Der Mikroprozessor wird automatisch die VentilatorGeschwindigkeit kontrollieren.
ZEITSCHALTUHR - EINSTELLUNG An der Fernbedienung können vier Zeitschaltuhren gewählt werden. Zwei Tages-Zeitschaltuhren (T1, T2 genannt) und als Option, zwei Wochenende-Zeitschaltuhren (WKT1, WKT2 genannt). Jede Zeitschaltuhr kann durch Drücken der Taste TIMER gewählt werden. Mit den Tages-Zeitschaltuhren T1 und T2 kann Ein- und Ausschalten getrennt für zwei verschiedene Zeiträume programmiert werden. Nach der Einstellung funktioniert die Zeitschaltuhr täglich.
LUFTSTROM-EINSTELLUNG Der Luftstrom kann eingestellt werden, indem man die Klappe auf dem Luftauslaß bewegt. Mit den beiden Händen die Luftleitlamelle fassen und an sich ziehen, um den Luftstrom einzustellen. Vertikal Lufstrom Horizontal Lufstrom D WIE DIE KONDENSWASSERBEHÄLTER ZU ENTLEEREN Das Klimagerät beseitigt die Luftfeuchte, die im innen Behälter aufgenommen wird. Das Kondenswasser kann durch den außen Flußrohr ausgelassen werden, der sich auf der Rückseite des Gerätes befindet.
BETRIEBSWEISE OHNE FERNBEDIENUNG Wenn die Fernbedienung nicht funktioniert oder verloren ging, wie folgt vorgehen: 1. KLIMAGERÄT AUßER BETRIEB Wenn Sie das Klimagerät in Betrieb setzen wollen, ist die Betriebstaste zu drücken, um die gewünschte Funktion auszuwählen. ANMERKUNG Das Klimagerät wird mit der automatischen Ventilator-Geschwindigkeit einschalten Die Temperatur-Einstellung wird 22°C für die Kühlung Betriebsweise und 28°C für die Heizung Betriebsweise sein. 2.
RUNDES FENSTER KIT EINZELGLAS DOPPELGLAS MONTAGE ANMERKUNG HOLE HOLE HOLE ANMERKUNG ● Das Fensterglas lochen. ● Das runde Fenster ohne Deckel einsetzen. ● Die Ausblasedüse Schlauch entfernen. ● Das Klimagerät ans Fenster nähern und das Auslaufrohr in das runde Fenster einsetzen. vom Wenn man das Klimagerät in mehreren Zimmer brauchen will, ist es möglich mehrere runde Fenstern für Luftauslassen kaufen.
INDICE GEG EL PRODUCTO ........................................................................................................... 2 SEÑALIZACIONES... ................................................................................................... 3 ANTES DE USAR EL ACONDICIONADOR ............................................................... 3 COMO USARLO ......................................................................................................... 4 USO DEL MANDO A DISTANCIA .....
SEÑALIZACIONES 1 6 2 3 4 5 1. Receptor: recibe las señales enviadas por el mando a distancia. 2. Testigo del temporizador (TIMER): se enciende cuando la unidad es controlada por el temporizador o por el programa nocturno. 3. Testigo de funcionamiento (OPERATION): se enciende cuando la unidad está funcionando. El parpadea una vez para indicar que el señal del mando a distancia a sido recibido y memorizado. El parpadea continuamente durante las modalidades de protección (descongelación, ecc.). 4.
COMO USARLO REFRIGERACION ● Acercar lo más posible el acondicionador a una ventana. Acoplar el tubo flexible enganchándolo en la parte posterior del aparato. Estirar el tubo flexible cuanto sea necesario para llegar al exterior y pasarlo entre los batientes de la ventana con la mínima abertura indispensable. Si la ventana tiene un alfeizar interno es aconsejable utilizar la boquilla terminal suministrada con el aparato. Acoplar el terminal al extremo libre del tubo flexible.
MANDO A DISTANCIA VISOR Visualiza las informaciones cuando el mando a distancia está encendido.
SELECCION DE LA VELOCIDAD DEL VENTILADOR AJUSTE DE LA HORA 1. 2. 3. Presionar el pulsador SET durante cinco segundos. La indicación de la hora solamente parpadea en el visor. Presionar los pulsadores + o - hasta que se visualiza la hora corriente. Presionar el pulsador SET y la indicación deja de parpadear. REFRIGERACION NOTA GEG Verificar que la unidad está conectada a la alimentación eléctrica y que el testigo STANDBY está encendido. 1.
REGULACION DEL TEMPORIZADOR En el mando a distancia pueden seleccionarse cuatro temporizadores. Dos temporizadores cotidianos (designados T1, T2) y dos temporizadores optativos para fines de semana (designados WKT1, WKT2). Cada uno de los temporizadores puede seleccionarse presionando el botón TIMER. Los temporizadores cotidianos T1 y T2 se pueden regular por separado en ON y OFF para dos distintos períodos de tiempo. Cuando el temporizador está programado vuelve a funcionar cuando se lo pone en marcha.
REGULACION DEL FLUJO DEL AIRE Se puede regular la dirección del flujo del aire actuando sobre el deflector móvil situado en la boca superior de salida del aire; tomar la aleta del deflector y tirar hacia sí mismo para orientar el flujo del aire. Flujo Vertical Flujo Horizontal COMO DESCARGAR EL AGUA DE CONDENSACION GEG El acondicionador absorbe la humedad del aire que se recoge en el depósito interior y se puede vaciar a través del tubo de descarga situado en la parte posterior del aparato.
FUNCIONAMIENTO DE LA UNIDAD SIN EL MANDO A DISTANCIA Si ha perdido el mando a distancia o éste está estropeado, siga las siguientes instrucciones: 1. CUANDO EL ACONDICIONADOR SE HA PARADO. Para poner en marcha el acondicionador de aire presionar el botón de funcionamiento. NOTA El acondicionador se pondrá en marcha con la velocidad automática del ventilador. La programación de la temperatura es 22°C para la modalidad de refrigeración y 28°C para la calefacción. 2. CUANDO EL ACONDICIONADOR ESTA FUNCIONANDO.
KIT JUNTA ELASTICA CRISTAL SIMPLE CRISTAL DOBLE MONTAJE ● Realizar un agujero en el cristal de la ventana. ● Montar la junta elástica sin el cierre en el agujero. ● Desmontar la boquilla del tubo flexible. ● Acercar el acondicionador a la ventana y embocar el extremo cilíndrico del tubo flexible al agujero. AGUJERO NOTA AGUJERO AGUJERO NOTA Si se desea utilizar el mismo climatizador en varios locales pueden adquirirse los “kit junta elástica / disco transparente” que se necesiten.
INDICE O PRODUTO ............................................................................................................... 2 LAMPADAS ................................................................................................................. 3 ANTES DE USAR O APARELHO ................................................................................ 3 FONCIONAMENTO ....................................................................................................
LAMPADAS 1 6 2 3 4 5 GPG 1. Receptor : recebe os sinais enviados pelo controle remoto. 2. Lâmpada TIMER: Esta lampada acende-se quando controlada pelo timer ou pelo modo SLEEP. 3. Lâmpada OPERATION: Esta lâmpada acende-se quando o sistema está em funcionamento. Lampeja uma vez para avisar que o sinal do controle remoto foi recebido e memorizado. Lampeja seguidamente durante as funções de proteção (descongelamento, etc.). 4.
FUNCIONAMENTO REFRIGERAÇÃO ● ● ● ● ● ● Coloque o ar condicionado o mais perto possível de uma janela. Ajuste o tubo flexível prendendo-o na parte traseira do aparelho.Estenda o referido tubo até alcançar a janela passando-o através da mesma com as persianas entreabertas. No caso de haver uma janela soleira na sala, talvez seja melhor usar a extremidade do alimentador exterior. Coloque a extremidade na parte livre do tubo flexível. Abra a janela e feche uma das persianas.
UNIDADE DE CONTROLE REMOTO VISOR Mostra informações relativas às condições de operação quando a unidade de controle remoto está ligada. Modos de operação Confirma trasmissão de dados Frio ou controle remoto bloqueado Seco Ventilaçao Indica os timer TRANSMISSOR Quando é acionado o botão da unidade de controle remoto, o símbolo aparece no visor e os dados para o reajuste do aparelho de ar condicionado são transmitidos ao receptor.
AJUSTE DA VELOCIDADE DO VENTILADOR COMO AJUSTAR O RELÓGIO 1. Pressione “SET”. O indicador da hora somente pisca. AUTOMÁTICO 2. Pressione os botãos + ou - até ver a hora desejada. 3. Pressione o botão SET e o indicador retornará automaticamente ao normal. Coloque simplesmente o selector de “FANSPEED” na posição . . Um microcomputador, no aparelho de ar condicionado, controla a velocidade de ventilação quando o modo “AUTOMATICO” é selecionado.
AJUSTE DO TIMER Existem dois programadore de tempo que podem ser seleccionados no controle remoto. Dois são diários (designados por T1 ou T2) e outros são programadores de tempo, opcionais, de fim de semana, (designados como WKT1, WKT2). Qualquer programador de tempo pode ser seleccionado, carregando no botão TIMER. Os programadores de tempo diários T1 e T2 podem ser seleccionados para ON e OFF separadamente e, para dois períodos de tempo distintos.
AJUSTE DA DIRECÇÃO DO FLUXO DE AR Para ajustar a direcção do fluxo de ar, com as duas mão agarre a lâmina do reflector e puxe na sua direcção. Fluxo Vertical Fluxo Horizontal DESCARGA DE ÁGUA O ar condicionado retira humidade do ar e condensa-a para dentro de um depósito interno.A água condensada pode ser titada através do tubo de descarga externa localizado na parte traseira da unidade.
OPERAÇÃO SEM A UNIDADE DE CONTROLE REMOTO Em caso de perda, dano do controle remoto, siga os seguintes conselhos: 1. APARELHO DE AR CONDICIONADO DESLIGADO Se quiser ligar o aparelho, pressione o botão de operação . N.B. O aparelho de ar condicionado começa a funcionar com velocidade automatica do ventilador. O ajuste da temperatura é 22°C para a função “arrefecimento” e 28°C para a função “aquecimento”. 2.
KIT DE ABERTURA VIDRO SIMPLES VIDRO DUPLO Montagem: ● Faça uma abertura no vidro da janela. ● Insira a vigia sem a ficha eléctrica. ● Remova o tubo terminal de saída de ar quente do tubo flexível. ● Coloque o ar condicionado junto á janela e insira o tubo de saída de ar na abertura. BURACO NOTA BURACO BURACO NOTA Se quiser utilizar o ar condicionado em diferentes salas , é possível comprar vigias separadas para descargas de ar.
Tel. +39 0331 755111 - Fax +39 0331 776240 www.argoclima.it 11 S.A.C. - printed in Italy Via Varese, 90 - 21013 Gallarate - Va - Italy CAPACITOR DEFROST THERMOSTAT CM C1, 2, 3,4 DEF THERMO RELÉ ALIMENTAZIONE RELÉ POMPA OUTDOOR FAN MOTOR INDOOR FAN MOTOR INDICATOR ASSY MAGNETIC CONTACTOR NOISE FILTER OVERLOAD RELAY CONTROLLER POWER RELAY FMO FMI, FM IND.