EN CERAMIC FAN HEATER OPERATING INSTRUCTIONS Read the instructions carefully before installing and operating the appliance or performing maintenance operations. Observe all the safety instructions; failure to observe the instructions may cause accidents and/or damages. Store these instructions for future reference.
GENERAL SAFETY INFORMATION Use this fan heater only as outlined in this manual. Any other use not recommended by the manufacturer may cause fire, electric shock or injury to people. Ensure that the mains power complies with the voltage specified on the fan heater ’s data plate (220-240V~/50Hz). This product is not a toy. Children should be adequately supervised to ensure that they do not play with the appliance.
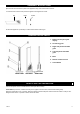
ASSEMBLY INSTRUCTIONS Open the box and remove the 3 parts of the appliance: body, base and remote control unit. 1. Insert the base onto the lower part of the appliance and tighten the screws. Unit Base Screws 2. Stand the appliance up vertically on a level surface before switching on. DESCRIPTION OF PARTS 1. Buttons and liquid crystal display 2. Air delivery grille 3. Right side panel and intake grille 4. Left side panel and intake grille 5. Base 6. Remote control receiver 7.
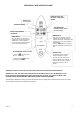
LED DISPLAY AND CONTROL PANEL TIMER Display: 1, 2,4, or 8 hours COMFORT mode LED: maximum heating power (2000W) Oscillation display ECO MODE LED: 1200 W reduced power to save energy Status display ON/OFF (STAND BY) TIMER button When the appliance is operating, the operating time can be set by touching TIMER button: 1,2,4, or 8 hours. The unit will switch off automatically at the end of the programmed time.
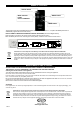
REMOTE CONTROL ON/OFF button SWING button Mode selection button ECO or COMFORT TIMER button The remote control uses Lithium/Manganese button cells, model no. CR2032 -3 V, compliant with Battery Directive no. 2006/66/CE (supplied with the remote control). HOW TO INSERT / REMOVE THE REMOTE CONTROL BATTERIES (refer to the diagram below) Open the battery cover at the rear of the remote control (press and pull the cover). Place the battery into the cover, observing the correct polarity.