EN DEHUMIDIFIER OPERATING INSTRUCTIONS Read the instructions carefully before operating or servicing the dehumidifier. Observe all the safety instructions; failure to observe the instructions may lead to accidents and/or damage. Keep these instructions in a safe place for future reference.
GENERAL OPERATING AND SAFETY INSTRUCTIONS • This appliance is a highly efficient dehumidifier, designed for domestic use only! • Use this dehumidifier only as outlined in this manual. Any other use not recommended by the manufacturer may cause fire, electric shock or malfunctions. • The unit contains refrigerant; keep it vertical at all times. • Once you have opened the unit, keep it vertical to allow the refrigerant to stabilise and wait two hours before operating it.
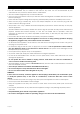
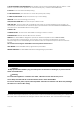
DESCRIPTION OF PARTS (1) FRONT VIEW (2) 1) CONTROL PANEL (MECHANICAL OR DIGITAL) 2) CARRY HANDLES 3) DEHUMIDIFIED AIR OUTLET 4) FRONT PANEL 5) WATER TANK; CAN BE REMOVED FOR EMPTYING 6) CONTROL PANEL (MECHANICAL OR DIGITAL) 7) REAR PANEL WITH AIR FILTER 8) CONDENSATE DRAINING HOLE (4) (3) (5) REAR VIEW (6) (7) (8) OPERATING INSTRUCTIONS APPLIANCE START-UP Place the product on a flat and stable heat-resistant surface, at least 1 metre away from flammable or heatsensitive materials and
If, on the other hand, the set humidity percentage is higher than the level currently found in the room, the dehumidifier will not start. If you follow the start up instructions but the dehumidifier does not start and the stand by led (Dry Baby 11) or display (Dry Digit 13 and 17) does not come on, or if the dehumidifier stops for no reason, make sure the plug and power cord are in good working order. After doing so, wait for 10 minutes and then restart the appliance.
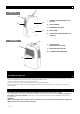
DRY BABY 11 CONTROL PANEL DEFROST LED TANK FULL LED STAND BY LED HUMIDITY ADJUSTER KNOB HUMIDITY ADJUSTER KNOB: sets the desired humidity %. Turn the knob fully counterclockwise (seen from in front of the appliance), to turn the appliance OFF. Turn the knob clockwise (seen from in front of the appliance) to set the humidity % (decreasing)(80-35%). TANK FULL LED: when the tank is full, the TANK FULL LED comes on and the appliance stops running. A 10 second beep sounds.
3. RELATIVE HUMIDITY ADJUSTER BUTTON: the humidity can be set from 35% to 80% in 5% steps with the + and buttons, or you can set the appliance to continuous drain (CO) – maximum dehumidification. 4. DISPLAY: shows the relative humidity setting. 5. FAN SPEED BUTTON: press this button to set the fan speed (LOW / HIGH). 6. TIMER ON/OFF BUTTON: delayed on/off button (2 or 4 hour delay). TIMER LED: shows the timer setting (2 or 4 hours). HIGH/LOW FAN SPEED LED: shows the fan speed: HIGH or LOW.
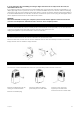
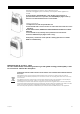
CLEANING THE AIR FILTER The filter is designed to remove dust or dirt from the air. If the filter is clogged by dust, electricity consumption will be higher than normal. For most effective dehumidification, clean the filter every 250 hours of operation. After 250 hours of operation, the FILTER RESET (Dry Digit 13 and 17) led turns on to indicate that it is time to clean the filter. Cleaning instructions: 1. Compress the two tabs and pull the filter out. 2.
www.argoclima.